Soaker Hose: How to Plan and Install It in Your Garden
Did you know that using a soaker hose can save up to 70% of water compared to traditional sprinklers? If you’re looking to keep your garden lush while conserving water, a soaker hose might be your best bet. Planning and installing one is easier than you might think, and it can make a significant difference in your garden’s health. In this guide, we’ll walk you through everything you need to know about choosing, planning, and installing a soaker hose in your garden. By the end, you’ll be equipped to transform your watering routine, ensuring your plants get the moisture they need efficiently and effectively. Let’s dive in and get your garden thriving!
Table of Contents
Assessing Your Garden’s Watering Needs and Goals
When it comes to maintaining a thriving garden, understanding and meeting its unique watering needs is essential. Assessing your garden’s watering needs and setting clear goals will not only promote healthy plant growth but also conserve water and minimize waste.
- Evaluate Plant Requirements:
- Identify the specific needs of each plant species, considering their age and growth stage.
- Consult reliable sources like gardening books or reputable websites to gather accurate information on each plant’s water requirements.
- Avoid overwatering or under-watering by understanding individual plant needs.
- Consider Environmental Factors:
- Account for temperature, humidity, and sunlight exposure, as these influence watering needs.
- Adjust watering schedules based on seasonal changes and current weather conditions.
- Assess Soil Type and Drainage:
- Conduct a soil test to determine its composition and water retention capabilities.
- Identify if your soil type retains water well or drains too quickly.
- Modify watering frequency and duration based on soil test results.
- Understand Local Climate:
- Determine if your garden is in an arid region with low rainfall or an area with frequent showers.
- Use knowledge of local weather patterns and average precipitation to guide supplemental watering.Be prepared to adjust watering during dry or wet periods to meet your garden’s needs effectively.
By thoroughly assessing your garden’s watering needs and setting realistic goals, you can lay the foundation for a well-hydrated and flourishing garden. In the following sections, we will explore the selection and installation of the right soaker hose to help you meet these needs efficiently and effectively.
Selecting the Right Soaker Hose for Your Garden
Selecting the right soaker hose for your garden is essential to ensure efficient watering and optimal plant growth. With various options available in the market, it is important to consider a few key factors before making your decision.
- Material:
- Choose between rubber and porous material.
- Rubber hoses are more durable and resistant to damage.
- Porous hoses release water evenly along their entire length.
- Length and Diameter:
- Evaluate the length based on the area you need to cover.
- Consider the diameter, as it affects water flow rate.
- Larger diameter hoses deliver more water, suitable for water-demanding plants.
- Water Pressure:
- Check the optimal pressure range for the soaker hose.
- Ensure your water source can provide sufficient pressure.
- Inadequate pressure leads to uneven watering.
- Additional Features:
- Some hoses have adjustable flow rates or built-in pressure regulators.
- Use these features to fine-tune watering for specific plant needs.
By carefully considering these factors and choosing the right soaker hose for your garden, you can ensure efficient and effective watering, leading to healthier, more vibrant plants. So, take the time to research and select a high-quality soaker hose that suits your garden’s unique needs.
Having recently invested in the Rocky Mountain Goods Flat Soaker Hose for my garden, I can confidently say it has transformed my watering routine for the better.
One of the most impressive aspects of this soaker hose is its ability to provide even water distribution. As someone who values efficient watering practices, I appreciate how it delivers moisture directly to the root zone, ensuring optimal hydration for my plants without wastage.
The hose’s flexible design has been a game-changer in navigating around my garden beds and various obstacles. Its flat construction allows me to lay it out effortlessly, reaching even the most secluded corners of my garden with ease.
Durability is another key feature of this soaker hose. Made of high-quality rubber, it has proven resistant to kinks and cracks, even with frequent use. This longevity gives me peace of mind, knowing that my investment will last for seasons to come.
However, there are a few considerations to keep in mind. While the hose is customizable in length, larger garden areas may require multiple hoses, which can add to the initial cost. Additionally, I’ve found that water pressure can affect performance, sometimes requiring adjustments for optimal watering.
Overall, my experience with the Rocky Mountain Goods Flat Soaker Hose in my garden has been overwhelmingly positive. Its efficient watering, flexibility, and durability have simplified my gardening tasks, allowing me to enjoy a lush and thriving garden with minimal effort.

- Even Water Distribution: Delivers water directly to the root zone for optimal hydration.
- Flexible Design: Flat construction allows for easy maneuverability around garden beds and obstacles.
- Durable Material: Made of high-quality rubber for longevity and resistance to kinks and cracks.
- Customizable Length: Can be cut to desired length for tailored watering needs.
- Saves Water: Minimizes water waste by delivering moisture directly to the soil where it’s needed.
- Versatile Use: Suitable for various garden layouts, including flower beds, vegetable gardens, and landscaped areas.
- Limited Coverage: May require multiple hoses for larger garden areas.
- Pressure Sensitivity: Performance may vary depending on water pressure; may require adjustments.
- Weed Growth: Flat design may encourage weed growth if not properly covered or mulched.
- Not Suitable for Lawns: Designed for targeted watering of garden beds, not suitable for lawns.
- Storage Space: Flat design may be more challenging to store compared to traditional round hoses.
- Initial Soaking Required: May need to be soaked before use to ensure even water distribution along the entire length.
Gathering the Necessary Tools and Materials for Installation
When it comes to installing a soaker hose in your garden, gathering the necessary tools and materials is the first step towards ensuring a successful installation. With the right equipment on hand, you’ll be able to complete the process smoothly and efficiently.
Here are some essential tools and materials you’ll need for installing a soaker hose:

1. Soaker hose: Select a high-quality, durable soaker hose that is suitable for your garden size and layout. Consider factors such as length, diameter, and material composition to ensure proper water distribution.
2. Hose connector: A hose connector is necessary to join multiple soaker hoses together or to connect the soaker hose to your water source. Choose a connector that is compatible with your soaker hose and provides a secure connection.
3. Pressure regulator: Installing a pressure regulator will help control the water flow and prevent excessive pressure buildup, which can lead to hose damage. Ensure that the pressure regulator is suitable for your specific garden watering needs.
4. Hose stakes or anchors: To keep the soaker hose in place and prevent it from shifting or getting tangled, use hose stakes or anchors. These will secure the hose to the ground and ensure consistent water distribution.
5. Mulch or groundcover: Adding a layer of mulch or groundcover over the soaker hose can help retain moisture and protect the hose from damage. Choose a suitable organic mulch or groundcover that will not interfere with the water distribution.
By gathering these essential tools and materials beforehand, you’ll set yourself up for a successful installation and be able to enjoy the benefits of a properly installed soaker hose system in your garden.
Preparing Your Garden Space for the Soaker Hose
Preparing your garden space for the soaker hose is a crucial step in ensuring its proper functioning and effectiveness. Before installing the hose, it is important to clear the area of any debris, rocks, or other obstructions that may impede water flow. This will help prevent clogging and ensure even distribution of water throughout your garden.
- Level the Ground:
- Clear the Area: Remove any debris, rocks, or obstacles from the area where the soaker hose will be placed.
- Level the Soil: Use a rake or shovel to smooth out the soil, ensuring it is even. This prevents water from pooling in certain areas, which can cause uneven watering.
- Lay Down Mulch or Groundcover:
- Spread a Protective Layer: After leveling the ground, lay down a layer of organic mulch or groundcover over the area.
- Protect the Hose: The mulch acts as a barrier, preventing the soaker hose from direct contact with the soil, which can cause damage over time.
- Conserve Water: Mulch helps retain moisture in the soil, reducing the frequency of watering and promoting water conservation.
Taking the time to properly prepare your garden space for the soaker hose installation will set the foundation for a successful and efficient watering system. By addressing any obstacles, leveling the ground, and adding a layer of mulch, you can ensure that your plants receive the right amount of water while minimizing water waste.
Here’s a concise table summarizing steps for preparing your garden space for a soaker hose:
| Preparing Garden Space for Soaker Hose | Description |
|---|---|
| Assess Garden Layout | – Determine the layout of your garden beds and plant locations. |
| Select Soaker Hose Length | – Choose a soaker hose length that covers the entire garden area. |
| Remove Debris and Weeds | – Clear the garden space of debris, weeds, and any obstacles. |
| Loosen Soil | – Use a rake or garden fork to loosen the soil surface for better water penetration. |
| Level the Ground | – Ensure the ground is level to promote even water distribution. |
| Layout Soaker Hose | – Place the soaker hose along the desired paths or around plants. |
| Secure Hose in Place | – Use garden stakes or U-shaped pins to secure the soaker hose in position. |
| Connect to Water Source | – Connect the soaker hose to a water source, such as a garden faucet or irrigation system. |
| Test Water Flow | – Turn on the water briefly to check for even water distribution along the hose. |
| Adjust Placement if Needed | – Modify the hose layout or secure it further if necessary for optimal coverage. |
| Cover with Mulch (Optional) | – Apply a layer of mulch over the soaker hose to retain moisture and reduce evaporation. |
| Monitor and Adjust | – Regularly check the hose for clogs or damage and adjust the flow rate as needed. |
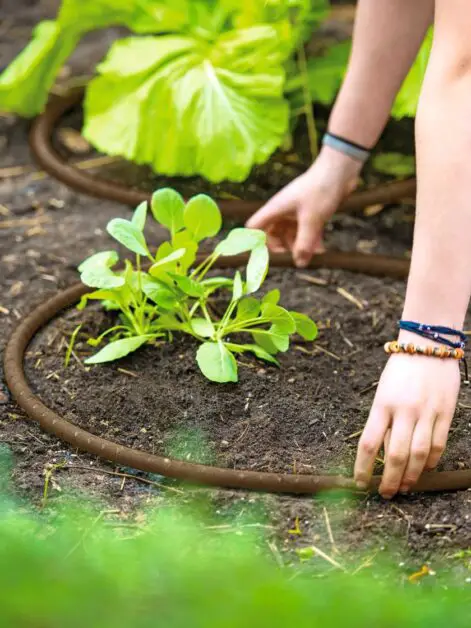
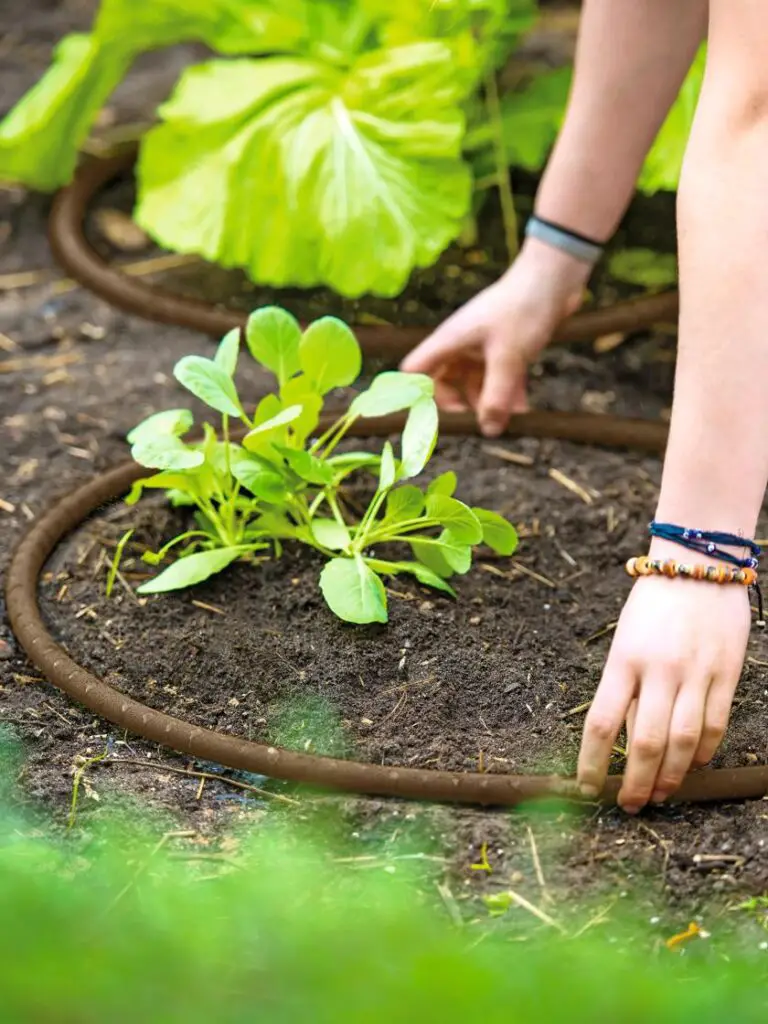
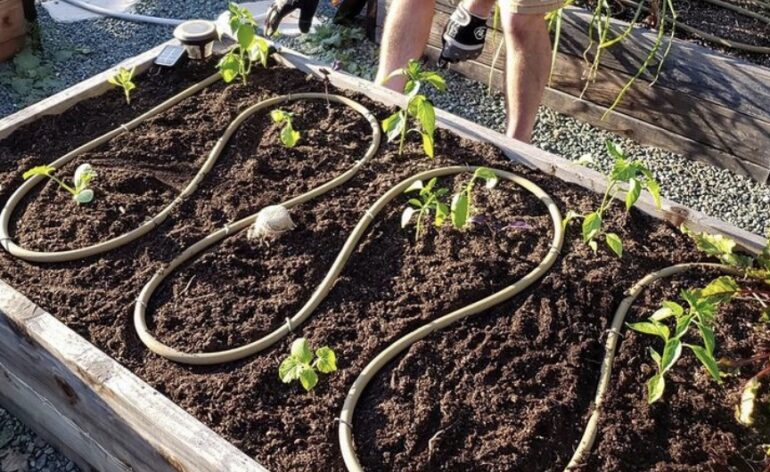
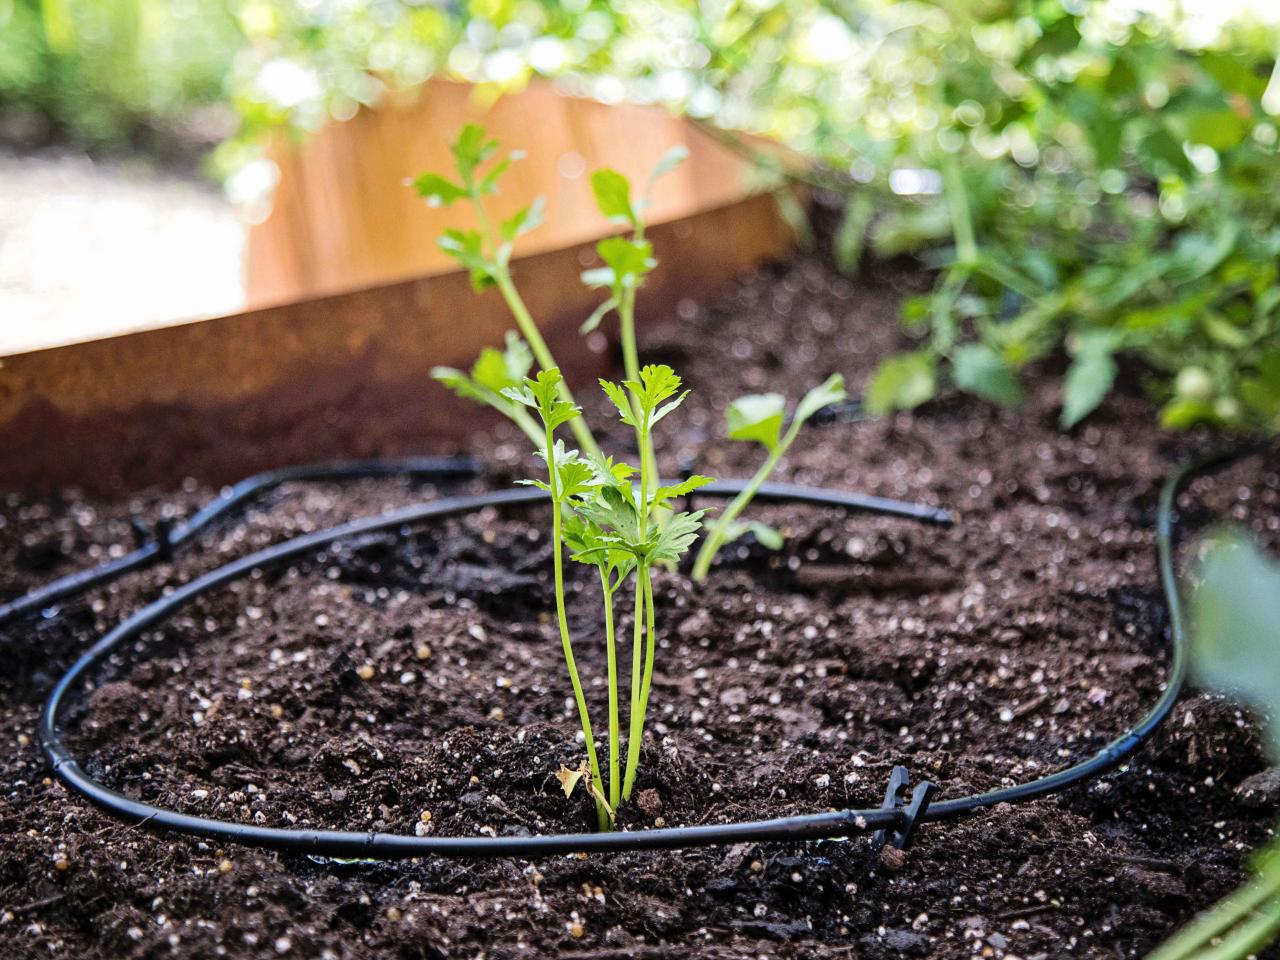
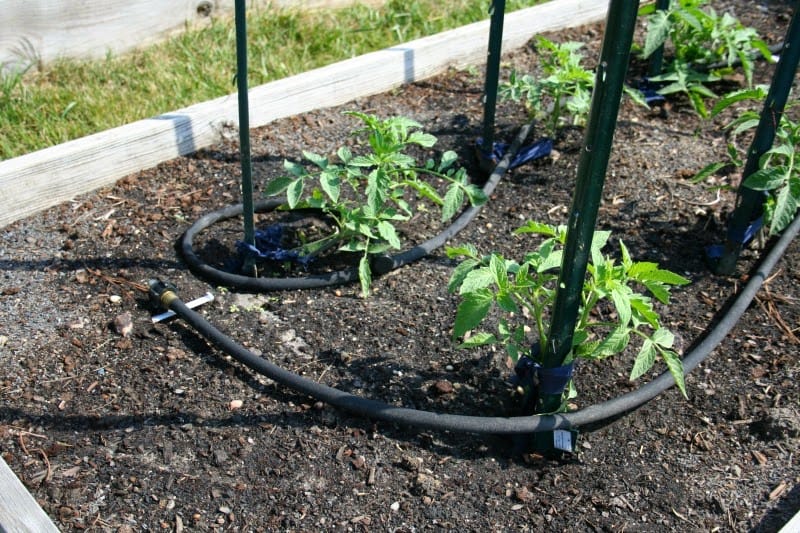
Determining the Ideal Placement for Your Soaker Hose
Determining the ideal placement for your soaker hose is crucial to ensuring that your garden receives adequate and efficient watering. There are a few key factors to consider when deciding where to lay your soaker hose.
Identify plants with similar water requirements.
Group them together to adjust water flow accordingly.
Note any slopes, raised beds, or planters.
Position the soaker hose strategically to avoid water pooling or rapid runoff.
Ensure easy connection to your water supply.
Avoid kinks or bends that could restrict water flow.
By carefully assessing the specific watering needs of your plants, considering the layout of your garden, and ensuring easy access to your water source, you can determine the ideal placement for your soaker hose. This will result in an efficient and effective watering system that promotes healthy plant growth and conserves water.
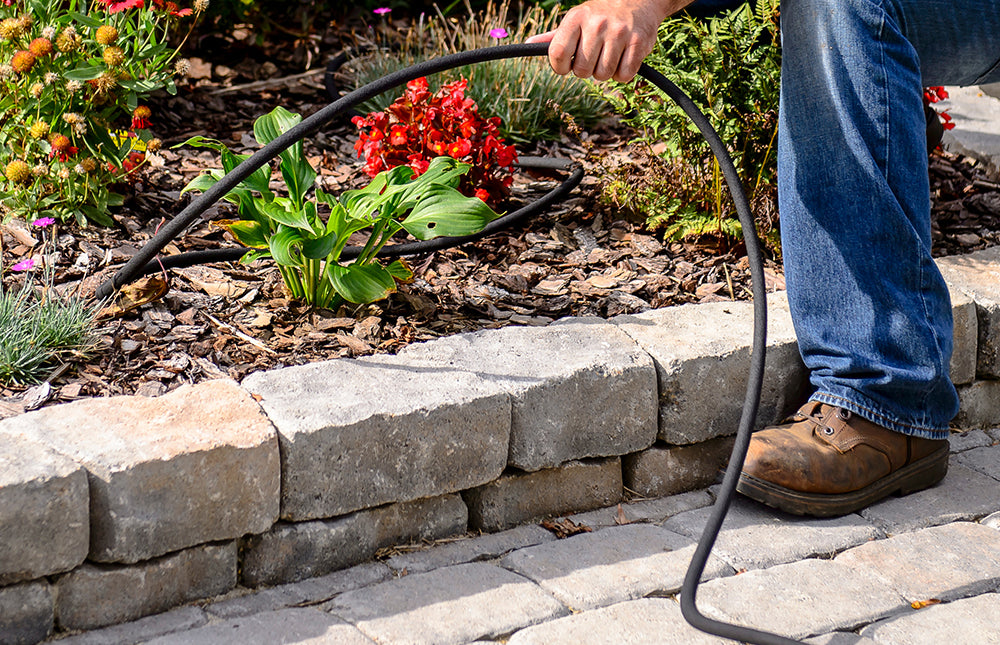
Measuring and Cutting the Soaker Hose to Fit Your Garden Layout
To ensure that your soaker hose system fits seamlessly into your garden layout, accurate measurement and precise cutting are essential steps. Measuring your garden space accurately will help you determine the length of soaker hose you need and avoid any unnecessary waste or shortage.
- Lay Out the Hose:
- Plan the Route: Position the soaker hose along the areas in your garden that need watering.
- Follow Curves and Bends: Note any bends or curves the hose needs to follow for effective watering coverage.
- Measure the Hose:
- Use a Measuring Tape: Measure the total length of the hose required, including any extra length needed to reach your water source.
- Add Extra Inches: Include a few additional inches to account for unexpected variations in the garden layout.
- Cut the Hose:
- Mark the Spots: Mark the exact points where the hose needs to be cut.
- Use Sharp Tools: With sharp scissors or a utility knife, make clean, straight cuts at the marked spots.
- Double-Check Measurements: Before cutting, verify your measurements to ensure accuracy and prevent wastage.
- Exercise Caution: Cut carefully to avoid damaging the hose.
By accurately measuring and cutting the soaker hose to fit your garden layout, you can ensure an efficient and effective watering system that caters to the specific needs of your plants. Now that we have covered this step, let’s move on to connecting the soaker hose to your water source, which is the next crucial task in the installation process.
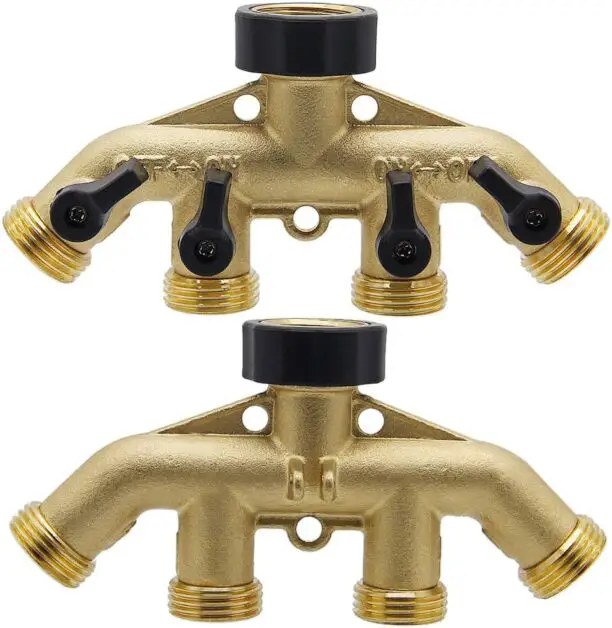
Connecting the Soaker Hose to Your Water Source
To connect the soaker hose to your water source, you will need a few key tools and materials.
- Get the Right Connector:
- Use a connector specifically designed for soaker hoses.
- Look for one with a threaded end that fits standard outdoor faucets or timer devices.
- Consider using a pressure regulator to ensure appropriate water pressure.
- Assemble the Tools and Materials:
- Gather your connector, soaker hose, and any other necessary tools.
- Make sure everything is ready before starting.
- Attach the Connector:
- Screw the connector onto the threaded end of the faucet or timer device.
- Ensure it is securely fastened to prevent leaks.
- Connect to the Soaker Hose:
- Take the other end of the connector and attach it to the inlet of your soaker hose.
- Tighten it well to avoid any leaks.
- Test the System:
- Turn on the water source.
- Check for leaks or irregular water flow.
- Adjust the pressure regulator if needed.
By following these steps, you’ll have your soaker hose connected and ready to efficiently water your garden. Happy gardening! 🌿🌼🚿
In my quest for efficient watering solutions for my garden, I recently incorporated the Twinkle Star Garden Hose Splitter Connector Adapter to connect my soaker hose. Here’s my experience:
First and foremost, the splitter’s ability to connect two hoses to one faucet proved invaluable. With the soaker hose attached to one outlet and a regular hose to the other, I could simultaneously water different areas of my garden without the hassle of constantly switching hoses.
The splitter’s construction impressed me with its durability. Made of sturdy materials, it withstood outdoor elements and constant water pressure without any signs of rust or degradation. Installation was a breeze, requiring no additional tools or complicated steps.
Individual control valves for each outlet allowed me to customize the water flow to suit each area of my garden’s needs. This feature ensured efficient watering, preventing over or under-watering of specific plants.
However, there were a few considerations to keep in mind. The bulky design of the splitter did take up some space near the faucet, which might be an issue for those with limited outdoor space. Additionally, I noticed a slight reduction in water pressure when both hoses were in use simultaneously, although this was expected.
Overall, the Twinkle Star Garden Hose Splitter Connector Adapter proved to be a valuable addition to my gardening toolkit. Its convenience, durability, and customizable water flow control made it an essential component for efficient garden watering, especially when using a soaker hose.
✅ Durable Build: Made of sturdy and rust-resistant materials for long-lasting use in outdoor environments.
✅ Easy Installation: Simple setup without the need for additional tools or expertise.
✅ Individual Control: Each outlet features a separate valve for customized water flow control.
✅ Versatile Use: Suitable for various outdoor watering tasks, including gardening, lawn maintenance, and car washing.
✅ Leak-Proof Design: Ensures a tight seal to prevent leaks and water wastage during operation.
❌ Size Consideration: Bulky design may obstruct other nearby fixtures or gardening equipment.
❌ Plastic Construction: Some users may prefer a metal construction for increased durability.
❌ Valve Operation: Valves may become stiff over time, requiring occasional lubrication for smooth operation.
❌ Pressure Reduction: Dividing water flow between two hoses may result in reduced pressure for each outlet.
❌ Risk of Cross-Contamination: If used for different purposes, there’s a potential risk of cross-contamination between hoses.
Testing the Water Flow and Adjusting Pressure
When it comes to testing the water flow and adjusting pressure in your soaker hose system, there are a few key steps to follow. First, ensure that all connections are secure and there are no leaks in the hose or fittings. This can be done by simply turning on the water and observing for any signs of water escaping. If you do notice any leaks, tighten the connections or replace any damaged parts as necessary.
- Check for Leaks:
- Inspect the Hose: Ensure there are no leaks along the length of the soaker hose before assessing the water flow.
- Measure Water Flow:
- Set Up a Container: Place a bucket or measuring cup at a specific distance from the hose.
- Record Water Collection: Turn on the hose and use a timer to record the amount of water collected over a set period.
- Calculate Flow Rate: Note the volume of water collected to determine the flow rate.
- Assess the Flow Rate:
- Evaluate Results: Compare the collected water volume against the desired flow rate for your plants.
- Check Water Source: If the flow is too low, inspect your water source and faucet pressure.
- Adjust Water Pressure:
- Reduce Excess Flow: If the flow is too high, install a flow control valve or a pressure regulator to the system.
- Fine-Tune Pressure: Adjust the pressure as needed to ensure the proper amount of water is delivered to your garden.
- Regular Monitoring:
- Consistent Checks: Regularly monitor the water flow and pressure.
- Make Adjustments: Continuously adjust as necessary to maintain optimal effectiveness of your soaker hose system.
By following these steps, you can effectively assess and adjust the water flow in your soaker hose, ensuring your plants receive the right amount of water for healthy growth.
Covering the Soaker Hose with Mulch or Groundcover
Covering the soaker hose with mulch or groundcover is an important step in maintaining the efficiency and effectiveness of your irrigation system. By providing a protective layer over the hose, you can minimize evaporation, prevent weed growth, and maintain a consistent moisture level in the soil.

- Mulch:
- Mulch (such as wood chips or straw) acts as a protective barrier between the soaker hose and the environment.
- It reduces water loss through evaporation.
- Helps regulate soil temperature (keeping it cooler in hot weather and warmer in cold weather).
- Promotes optimal root growth and overall plant health.
- Groundcover Plants:
- Low-growing plants (e.g., creeping thyme, clover) can cover the soaker hose.
- They provide protection and aesthetic appeal to your garden.
- Suppress weed growth, reducing competition for water and nutrients.
- Improve soil structure and fertility through their root systems.
- Application:
- Apply mulch or plant groundcover plants at an appropriate depth (usually 2 to 4 inches).
- Ensure sufficient coverage while allowing water to penetrate the soil.
- Avoid covering the hose too tightly to prevent water distribution restrictions.
Properly covering the soaker hose will help maintain a healthy garden while minimizing water waste and effort. 🌱💧🌿
Monitoring and Maintaining Your Soaker Hose System
To ensure the proper functioning of your soaker hose system and maintain the health of your garden, it is crucial to monitor and maintain the system regularly.
- Monitor Water Flow:
- Observe Flow Regularly: Watch the water flow to ensure it’s consistent and even across the entire length of the hose.
- Check for Leaks: Look for any leaks or blockages that could disrupt the water distribution.
- Assess Performance:
- Evaluate Efficiency: Regularly assess the overall performance of the soaker hose to identify any inefficiencies.
- Address Issues Promptly: Fix any issues such as uneven water distribution or low flow rates as soon as they are detected.
- Perform Regular Maintenance:
- Remove Debris: Clear away any weeds or debris that accumulate around the hose to prevent blockages.
- Inspect for Damage: Periodically inspect the hose for wear and tear, such as cracks or splits.
- Replace Damaged Sections: Replace any damaged sections of the hose to maintain optimal performance.
- Protect the Hose:
- Cover with Mulch: Ensure the soaker hose is adequately covered with mulch or groundcover to protect it from direct sunlight.
- Prevent Deterioration: Protecting the hose from sunlight helps prevent deterioration over time.
By actively monitoring and maintaining your soaker hose system, you can enjoy a well-functioning and efficient irrigation method that promotes the health and growth of your plants.
Troubleshooting Common Issues with Soaker Hose Installation
Troubleshooting Common Issues with Soaker Hose Installation:
1. Uneven Water Distribution: One common issue that gardeners may encounter with soaker hose installation is uneven water distribution. This can result in some areas of the garden receiving too much water, while others may not receive enough. To address this, it is important to ensure that the soaker hose is properly installed and positioned.
Check for any kinks or blockages that may be impeding water flow. Additionally, consider adjusting the water pressure to achieve a more uniform distribution. Monitoring the soil moisture levels using a moisture meter can also help identify areas that may require additional watering.
2. Clogging and Blockages: Another issue that gardeners may face is clogging and blockages in the soaker hose. Over time, sediment, debris, or particles from the water source can accumulate and obstruct the small pores of the hose. This can hinder the flow of water and reduce efficiency.
To prevent clogging, it is recommended to install a filter at the water source to remove any impurities. Regular maintenance is also essential, including flushing the hose periodically to remove any buildup. If clogs persist, it may be necessary to replace the soaker hose or use alternative filtration methods.
Remember, troubleshooting common issues with soaker hose installation requires patience, observation, and periodic maintenance. By addressing uneven water distribution and preventing clogging, you can ensure that your soaker hose system operates effectively, providing your garden with the water it needs for optimal growth.
Expanding or Modifying Your Soaker Hose System as Needed
Expanding or modifying your soaker hose system is a practical and cost-effective way to enhance the efficiency and effectiveness of your garden’s watering routine.
Evaluate Existing System: Review the current layout and determine if there are areas that need additional irrigation.
Identify Underwatered Areas: Pinpoint sections of your garden that are not adequately watered.
Determine Additional Coverage: Decide where new soaker hoses will be placed to improve water distribution.
Create a Layout Plan: Sketch a new layout incorporating the additional hoses and connections.
Evaluate Current System: Assess the water pressure and flow rate of your existing soaker hose system.
Calculate Limits: Ensure the water pressure is sufficient to support the additional hoses without compromising the system’s effectiveness.
Purchase Additional Hoses: Acquire the necessary length of soaker hoses to cover the new areas.
Get Connectors and Accessories: Obtain connectors, splitters, and any other accessories needed for the expansion.
Lay Out New Hoses: Position the new soaker hoses in the identified areas, following your layout plan.
Connect to Existing System: Use connectors or splitters to attach the new hoses to your existing system.
Check Water Flow: Turn on the water and observe the flow through the expanded system.
Adjust as Needed: Ensure that the water pressure remains consistent and adjust connectors or hoses if necessary.
Regular Inspections: Continue to monitor the entire soaker hose system, checking for leaks, blockages, and ensuring even water distribution.
Maintain and Protect: Keep the hoses covered with mulch or groundcover to protect from sunlight and debris.
By following these steps, you can successfully expand and modify your soaker hose system to meet the evolving needs of your garden, ensuring efficient and effective watering.
Tips for Maximizing the Efficiency and Effectiveness of Your Soaker Hose
To maximize the efficiency and effectiveness of your soaker hose, there are several key tips to keep in mind.
- Timing and Frequency:
- Water your garden in the early morning or late evening when temperatures are cooler.
- This minimizes evaporation and allows water to penetrate deeply into the soil, reaching plant roots effectively.
- Aim for longer, thorough watering sessions rather than frequent shallow watering.
- Water Pressure:
- Soaker hoses operate best at low pressure (around 20 psi).
- Excessive pressure can cause water to spray out instead of seeping evenly into the soil.
- Use a pressure regulator or flow control valve to maintain the ideal pressure.
- Regular Inspection and Maintenance:
- Check for leaks or clogs in the hoses and repair them promptly.
- Clear away debris or mulch that may block the pores of the soaker hose.
- Regular maintenance ensures efficient water flow.
- Automation:
- Consider using a timer or irrigation controller to automate your watering schedule.
- This helps prevent overwatering or under-watering.
Remember these points to keep your garden healthy and conserve water! 🌿💧🌼
Here’s a concise table summarizing tips for maximizing the efficiency and effectiveness of your soaker hose:
| Tips for Soaker Hose Efficiency | Description |
|---|---|
| Proper Hose Placement | – Lay the soaker hose along the base of plants for efficient water delivery to the root zone. |
| Adjust Hose Depth | – Bury the soaker hose under a layer of mulch or soil to enhance effectiveness and reduce evaporation. |
| Regular Inspection | – Periodically check for clogs, kinks, or damage; clean or repair as needed for optimal performance. |
| Customize Hose Layout | – Tailor the hose layout to match the specific watering needs of different plants or garden areas. |
| Use a Timer | – Install a timer to automate watering schedules, ensuring consistent and efficient moisture delivery. |
| Control Water Pressure | – Adjust water pressure to achieve the desired flow rate without causing excessive water wastage. |
| Apply Water Early Morning | – Water in the early morning to reduce evaporation and allow plants to absorb moisture before heat increases. |
| Consider Drip Irrigation Kits | – Supplement soaker hoses with drip irrigation in areas with varying water needs or for potted plants. |
| Rotate Soaker Hose Placement | – Change the position of the soaker hose periodically to promote even root growth and prevent overwatering in specific areas. |
| Mulch Around Plants | – Apply mulch around plants to retain soil moisture, reduce weeds, and enhance the effectiveness of the soaker hose. |
| Monitor Soil Moisture Levels | – Use a soil moisture meter to gauge moisture levels and adjust watering frequency accordingly. |
| Winter Storage | – Drain and store soaker hoses during the winter to prevent freezing and potential damage. |
By following these tips, you can maximize the efficiency and effectiveness of your soaker hose system, ensuring that your plants receive the optimal amount of water for healthy growth and bountiful harvests.
Conclusion: Enjoying the Benefits of a Well-Planned and Properly Installed Soaker Hose System in Your Garden
A well-planned and properly installed soaker hose system can provide numerous benefits for your garden.
- Efficient Water Delivery:
- Direct Root Irrigation: Soaker hoses deliver water directly to plant roots, ensuring targeted irrigation.
- Minimize Water Waste: Reduce water waste by focusing on the root zone instead of overhead watering.
- Reduce Disease Risk: Lower the risk of leaf diseases caused by wet foliage.
- Promote Deeper Root Growth:
- Encourage Resiliency: Promote deeper root growth, making plants more resilient to drought.
- Less Frequent Watering: Plants become less dependent on frequent watering.
- Convenience and Time-Saving:
- Minimal Maintenance: Once installed, soaker hoses require minimal upkeep.
- Automate Watering: Easily automate your watering schedule, freeing up time for other garden tasks.
- Customizable Irrigation:
- Adjustable Layout: Customize and adjust the soaker hose layout to fit specific garden areas.
- Ensure Adequate Moisture: Ensure each plant receives the correct amount of moisture.
- Optimizing Water Usage:
- Plan and Install: Invest in a well-planned and properly installed soaker hose system.
- Promote Plant Health: Optimize water usage to enhance plant health and vitality.
- Streamline Gardening Routine: Simplify your gardening routine with a cost-effective and eco-friendly irrigation method.
- Versatility:
- Adaptable to Garden Size: Suitable for small urban gardens or sprawling landscapes.
- Enhance Gardening Experience: Improve your gardening experience with efficient and effective irrigation.
So take the time to assess your garden’s watering needs, select the right soaker hose, and follow the recommended installation steps. Soon, you’ll be reaping the benefits of a thriving and beautiful garden.
Watch video for further information:
FAQ
How do I know if my garden needs a soaker hose system?
Assessing your garden’s watering needs and goals will help determine if a soaker hose system is necessary. If you have plants that require consistent and slow watering, such as vegetables or flower beds, a soaker hose can be beneficial.
What factors should I consider when selecting a soaker hose?
When choosing a soaker hose for your garden, consider factors such as length, material, and diameter. The length should be sufficient to cover your garden space, the material should be durable and UV-resistant, and the diameter should provide adequate water flow.
What tools and materials do I need to install a soaker hose system?
To install a soaker hose system, you will need tools such as scissors, a hose splitter, and connectors. Additionally, you will need a soaker hose, a water source, and mulch or groundcover to cover the hose.
How do I prepare my garden space for the installation of a soaker hose?
Before installing the soaker hose, it is important to clear the garden space of any debris or obstacles. Remove weeds and create a level surface where the hose can be laid out.
How do I determine the ideal placement for my soaker hose?
The ideal placement for the soaker hose is typically along the base of plants or in the root zones. Consider the specific watering needs of each plant and lay the hose accordingly.
Can I adjust the length of the soaker hose to fit my garden layout?
Yes, you can measure and cut the soaker hose to fit your garden layout. This allows for customization and ensures that all areas of your garden receive adequate watering.
How do I connect the soaker hose to my water source?
You can connect the soaker hose to your water source using a hose splitter or a connector. This allows you to control the water flow and easily connect multiple hoses if needed.
How can I troubleshoot common issues with soaker hose installation?
Common issues with soaker hose installation include leaks, uneven water distribution, and low water pressure. To troubleshoot, check for any leaks or blockages, adjust the water pressure, and ensure proper placement of the hose.
Can I expand or modify my soaker hose system in the future?
Yes, soaker hose systems are flexible and can be expanded or modified as needed. Additional hoses can be connected using connectors or splitters to accommodate changes in your garden layout.
How can I maximize the efficiency and effectiveness of my soaker hose?
To maximize efficiency, it is important to monitor and maintain your soaker hose system regularly. Adjust the water flow and pressure as needed, cover the hose with mulch or groundcover to prevent evaporation, and ensure proper placement for optimal water distribution.
What are the benefits of a well-planned and properly installed soaker hose system?
A well-planned and properly installed soaker hose system provides consistent and efficient watering for your garden. It helps conserve water by reducing runoff and evaporation, promotes healthier plant growth, and saves time and effort compared to manual watering methods.

Studied Agricultural Engineering-Plant Protection at University of California, Davis.
Head of Content writing team at Southelmontehydroponics.com