Curing Garlic for Long-Term Storage
Are you a garlic lover looking to elevate your culinary experience while reaping health benefits? Dive into the world of curing garlic, where flavor meets wellness in a delightful fusion. Did you know that curing garlic not only enhances its taste but also boosts its medicinal properties? From immune-boosting antioxidants to heart-healthy benefits, this humble bulb packs a powerful punch when cured just right.
Join us on a flavorful adventure as we explore the art of curing garlic and unlock its full potential. Get ready to tantalize your taste buds and nourish your body with this simple yet potent ingredient. Let’s embark on this aromatic journey together!
Table of Contents
Why Curing Garlic is Important for Long-Term Storage
:max_bytes(150000):strip_icc()/how-to-store-garlic-bowl-getty-0723-7e3fe2cf9efb4b57a5bd6f79d5f13d99.jpg)
Curing garlic is a crucial step in ensuring its long-term storage.
- Enhance flavor and shelf life: Allowing garlic to cure properly enhances its flavor and extends its shelf life, ensuring it remains fresh for longer periods.
- Prevent mold and rot: During curing, garlic cloves lose moisture, reducing their susceptibility to mold and rot, thus minimizing spoilage risks.
- Develop robust flavor: Properly cured garlic develops a more robust and complex flavor profile, enhancing its taste and making it a prized ingredient in various dishes.
- Improve texture: Curing not only enhances the taste but also improves the texture of garlic, making it easier to handle and use in cooking applications.
By understanding the importance of curing garlic, you can ensure that your harvest lasts for an extended period, providing you with a flavorful culinary staple year-round.
The Best Time to Harvest Garlic for Curing
To achieve the best flavor and storage potential, knowing the optimal time to harvest garlic for curing is crucial for gardeners and garlic enthusiasts alike.

Harvesting garlic for curing involves a few essential steps to ensure you get flavorful, well-preserved bulbs. Let’s break it down:
By harvesting garlic at the optimal time, gardeners can maximize the quality and longevity of their garlic harvest for storage and culinary use.
Choosing the Right Garlic Varieties for Long-Term Storage
When it comes to choosing the right garlic varieties for long-term storage, there are a few key factors to consider. Different garlic varieties have varying levels of storage capabilities, with some being better suited for prolonged storage than others.
The following table explains about the different garlic varieties for long-term storage:
| Variety | Advantages | Disadvantages | Characteristics |
|---|---|---|---|
| Rocambole | – Complex Flavor: Rich, garlicky taste with depth. | – Short Storage: Typically stores for 4-5 months only. | – Purple Stripe: Beautiful purple striping on bulb wrappers and clove skins. |
| – Edible Scapes: Curling scapes are edible and add beauty. | – Limited Availability: Rarer to find due to shorter storage life. | – Hardneck: Long flowering stem (scape) grows through the center of the bulb. | |
| – Heirloom Strains: Closely related to earliest heirloom garlic. | |||
| Porcelain | – Large Bulbs: Bulbs are big and uniform. | – Fewer Cloves: Generally fewer cloves per bulb. | – White Wrappers: White, papery bulb wrappers. |
| – Robust Flavor: Full, rich, and less sharp taste. | – Shorter Storage: Not as long-lasting as softneck garlic. | – Spicy: Sometimes spicier than other varieties. | |
| – Cold-Hardy: Requires exposure to cold temperatures for development. | |||
| California Early | – Early Harvest: Can be harvested early in the season. | – Smaller Bulbs: Bulbs are smaller compared to some other varieties. | – Softneck: No flowering stalk (scape). |
| – Mild Flavor: Mild, sweet taste. | – Less Intense: Flavor is not as strong as some other types. | – Adaptability: Grows well in various climates. | |
| – Good for Braiding: Softneck variety suitable for braiding. | |||
| Italian Late | – Late Harvest: Can be harvested later in the season. | – Fewer Cloves: Similar to California Early, fewer cloves per bulb. | – Rich Flavor: Full, robust flavor. |
| – Long Storage: Good storage life. | – Smaller Bulbs: Bulbs may be smaller. | – Softneck: No flowering stalk (scape). | |
| – Versatile: Suitable for various culinary uses. | |||
| Artichoke | – Large Bulbs: Artichoke garlic produces big, plump bulbs. | – Shorter Storage: Not as long-lasting as some other varieties. | – Easy to Peel: Cloves are easy to peel. |
| – Mild Flavor: Mild and slightly sweet taste. | – Fewer Cloves: Typically fewer cloves per bulb. | – Softneck: No flowering stalk (scape). | |
| – Adaptable: Grows well in various climates. | |||
| Silverskin | – Excellent Storage: Silverskin garlic stores exceptionally well. | – Small Cloves: Cloves are small, which can be tedious to peel. | – Long-Lasting: Can be stored for up to 9-12 months. |
| – Strong Flavor: Intense and pungent taste. | – Thin Skins: Bulbs have thin, papery skins. | – Braiding Potential: Suitable for braiding due to flexible stems. |
Remember that each garlic variety has its unique flavor profile and storage characteristics. Choose the one that best suits your culinary preferences and growing conditions! 🧄🌱
Preparing Garlic for Curing
Preparing garlic for curing is a crucial step to ensure flavorful, well-preserved bulbs. Let’s dive into the details:
Roots: Trim the roots close to the end of each bulb. Removing excess roots prevents them from rotting during curing.
Stalks (Stems): Cut the stalks (stems) to leave about an inch attached to the bulb. This step helps the garlic dry evenly and prevents mold growth.
After trimming, allow the garlic to sit in a well-ventilated area for a few hours. This further dries out the outer layers.
Properly preparing the garlic at this stage sets the foundation for successful curing.
Place the trimmed garlic bulbs in a cool, dry, and well-ventilated area.
Hang or Spread Out: You can hang them in bunches or spread them out on a mesh or wire rack.
Avoid Direct Sunlight: Keep the garlic away from direct sunlight during curing.
Cure for 2-4 Weeks: Allow the garlic to cure for 2-4 weeks. During this time, the outer layers will dry and harden.
Ideal Conditions: Maintain a temperature of around 70°F (21°C) and low humidity for optimal curing.
While preparing garlic for curing, inspect each bulb:
Damage: Discard any bulbs that appear moldy, soft, or discolored.
Prioritize Healthy Bulbs: Sort through the bulbs to prioritize the healthier ones for long-term storage.
Once cured, store the garlic in a cool, dark place. Hanging them in braids or bundles works well.
Avoid Refrigeration: Do not store cured garlic in the refrigerator, as it can lead to sprouting.
By investing time in thorough preparation, you’ll enjoy a bountiful supply of flavorful cured garlic that will last you through the seasons! 🧄🌱
The Ideal Conditions for Curing Garlic
When it comes to curing garlic for long-term storage, the ideal conditions play a crucial role in ensuring the garlic retains its flavor and quality. Proper ventilation is key, as good air circulation helps prevent mold and rot. It is important to choose a well-ventilated area with low humidity levels for the curing process. Additionally, a dark and cool space is ideal for curing garlic, as exposure to direct sunlight can cause the garlic to spoil.
Maintaining a stable temperature during the curing process is essential for optimal results. Higher temperatures can lead to sprouting, while lower temperatures may slow down the curing process.
The following table explains ideal conditions for curing garlic:
| Condition | Treatment | Effect |
|---|---|---|
| 1. Temperature | 70-80°F (21-27°C) | Promotes proper drying without heat damage. |
| 2. Humidity | 60-70% relative humidity (RH) | Prevents mold growth and maintains garlic quality. |
| 3. Air Circulation | Adequate air circulation around garlic bulbs | Ensures even drying and reduces risk of spoilage. |
| 4. Duration | 2-3 weeks | Allows for complete curing of garlic bulbs. |
| 5. Storage | Dry, well-ventilated area | Preserves cured garlic for long-term storage. |
By providing the garlic with the ideal conditions for curing, you can ensure that it develops the right texture and flavor for long-term storage.
Different Methods for Curing Garlic
When it comes to curing garlic, there are various methods you can use to ensure that your harvest is properly preserved for long-term storage. The following table explains about the different methods for curing garlic, along with their advantages, disadvantages, and characteristics:
| Method | Advantages | Disadvantages | Characteristics |
|---|---|---|---|
| Hanging Bulbs | – Promotes efficient curing. – Allows good air circulation. – Decorative when braided or tied. | – Requires a well-ventilated and dry area. | – Hang bulbs in bunches or braid stems. – Ensure proper air circulation. |
| Woven Baskets | – Provides good airflow. – Lined with paper towels to absorb moisture. | – Requires space for storage. | – Place garlic bulbs in woven baskets. |
| Mesh Bags | – Allows air circulation. – Convenient for storage. | – Avoid overloading bags. | – Store garlic bulbs in mesh bags. |
| Avoid Plastic Bags | – Prevents moisture buildup and mold growth. | – Plastic bags trap moisture. | – Use breathable containers. |
| Optimal Humidity | – Maintains flavor and quality. | – Too much moisture can lead to desiccation. | – Store at 60% humidity. |
| Ideal Temperature | – Extends shelf life. – Prevents sprouting. | – Avoid direct sunlight. | – Softneck: 0°C to 4°C (32°F to 40°F) – Hardneck: 0°C to 10°C (32°F to 50°F) – Elephant: 4°C (40°F) |
| Avoid Ethylene Emission | – Preserves flavor. | – Keep away from fruits and veggies emitting high ethylene levels. | – Store separately from ethylene-producing produce. |
Remember that proper curing and storage are essential for preserving the longevity and flavor of garlic. By following these methods, you can enjoy fresh garlic for up to six months! 🧄🌿
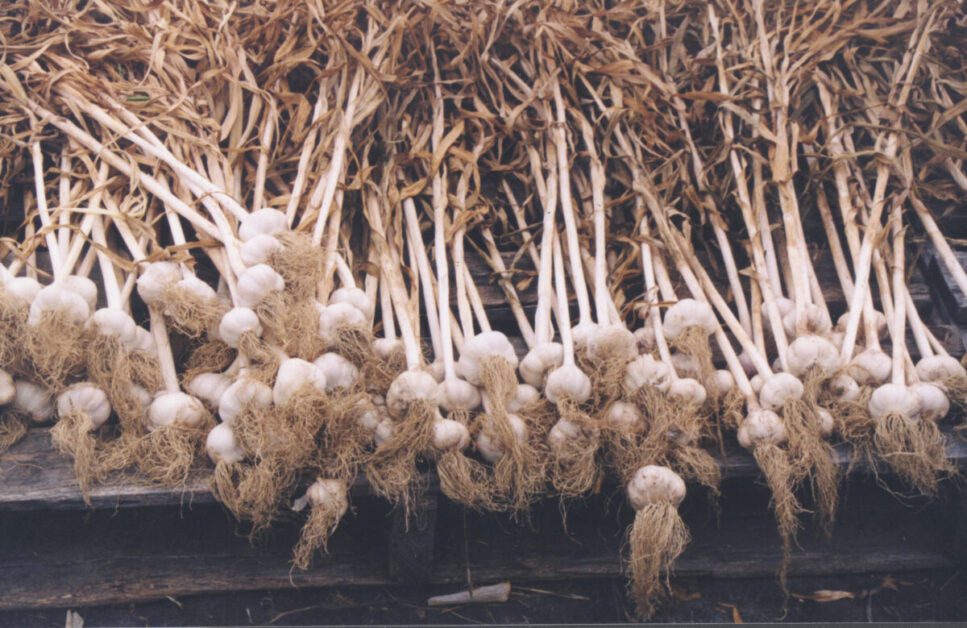
Air Drying Garlic for Long-Term Storage
Air drying garlic is a wonderful way to preserve its flavor and ensure long-term storage. Let’s dive into the process with some additional details:
When harvesting garlic, leave the stems intact. These stems will be useful for hanging or braiding the bulbs during the drying process.
Avoid washing the garlic bulbs. Moisture can lead to mold growth during drying.
Gently brush off any excess dirt from the bulbs.
Trim the roots and stems, leaving about one inch (2.5 cm) on top of the bulb.
Lay or hang the harvested garlic in a warm, dry, and well-ventilated area for up to 4 weeks.
Ideal locations include breezy barns, basements, or sheds where there’s good airflow and consistent temperatures below 90°F (32°C).
Small bulbs cure faster than large ones, and curing takes less time in low humidity.
Curing is complete when the outer skin is dry and crispy, the neck is constricted, and the center of the stem is hard.
After curing, trim the roots close to the bulb base and cut the shoots to about 1 inch (2.5 cm) above the bulb.
If you plan to braid the garlic bulbs together for storage, leave the shoots long.
Store cured garlic bulbs in a cool, dry place with good ventilation. Pantries or countertops work well.
Use breathable containers like mesh bags or loosely woven baskets to allow air circulation.
At room temperature (low humidity), cured garlic can last up to 2 months.
For long-term storage, keep cured bulbs around 30°F (−1°C) with good airflow; they’ll last up to 7 months.
Remember to replant the biggest bulbs for next year’s crop.
Remember, properly dried garlic should have papery skins, firm cloves, and a strong flavor. Enjoy your homegrown garlic throughout the year! 🌿🧄
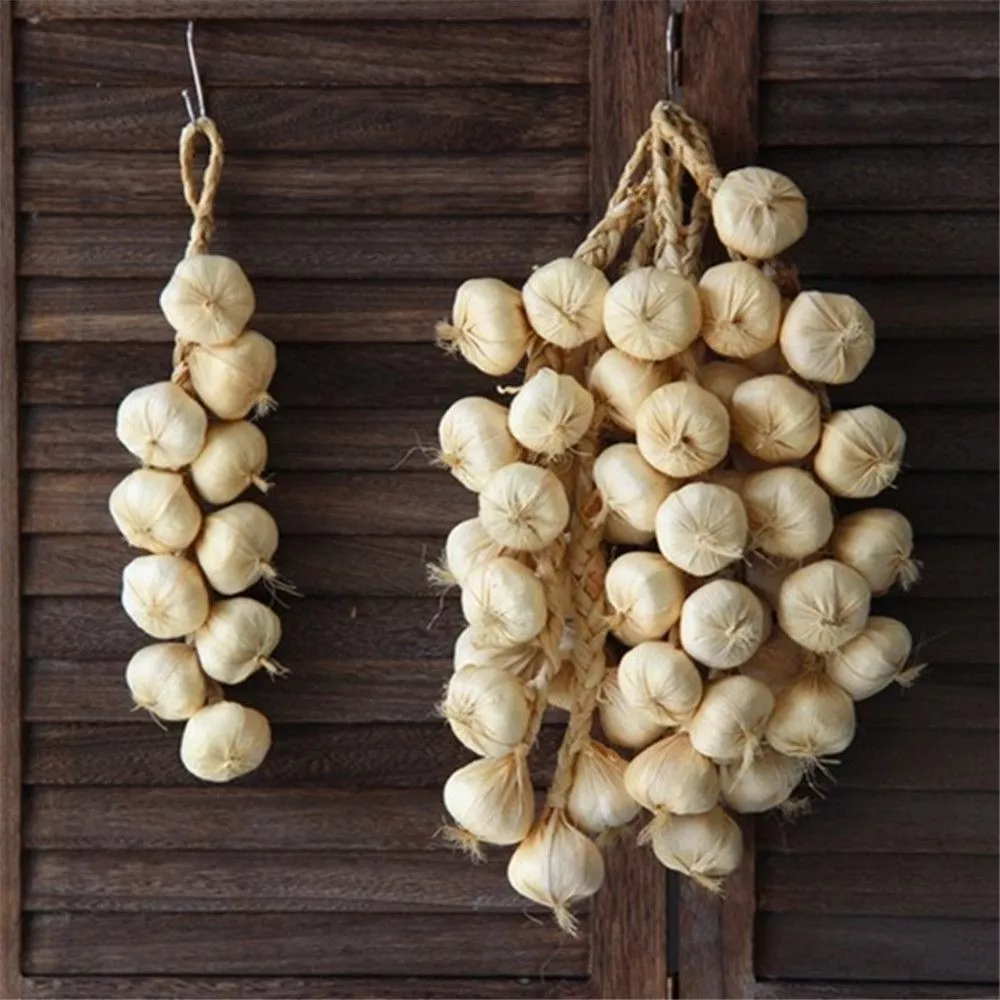
Braiding Garlic for Storage

Braiding garlic is a traditional and practical method for storing garlic long-term while also adding a decorative touch to your kitchen or storage area. By braiding garlic, you can create beautiful garlic braids that not only keep your garlic organized but also allow for good air circulation, which is essential for proper curing and storage.
- To braid garlic, start with several garlic bulbs with their leaves still intact.
- Gather the bulbs together and begin braiding by crossing the stems of the garlic bulbs over one another in a simple braid pattern.
- As you continue braiding, add more garlic bulbs by intertwining their stems with the existing braid.
- Once you reach the end, secure the braid with a string or twine, and hang it in a cool, dry place to finish the curing process.
- Braided garlic not only prolongs the shelf life of your garlic but also adds a rustic charm to your storage space.
Hanging Garlic for Curing
Hanging garlic for curing is a traditional method that allows for proper airflow around the bulbs, aiding in the drying process.
- Harvest garlic plants and clean bulbs of excess dirt.
- Tie cleaned bulbs together in small bunches using twine or rope.
- Hang bunches in a cool, well-ventilated area with low humidity.
- Ensure the location is dry with good air circulation and protection from direct sunlight.
- Hang garlic bulbs upside down to allow stems to wick away excess moisture.
- Monitor regularly to ensure bulbs are drying uniformly and show no signs of decay.
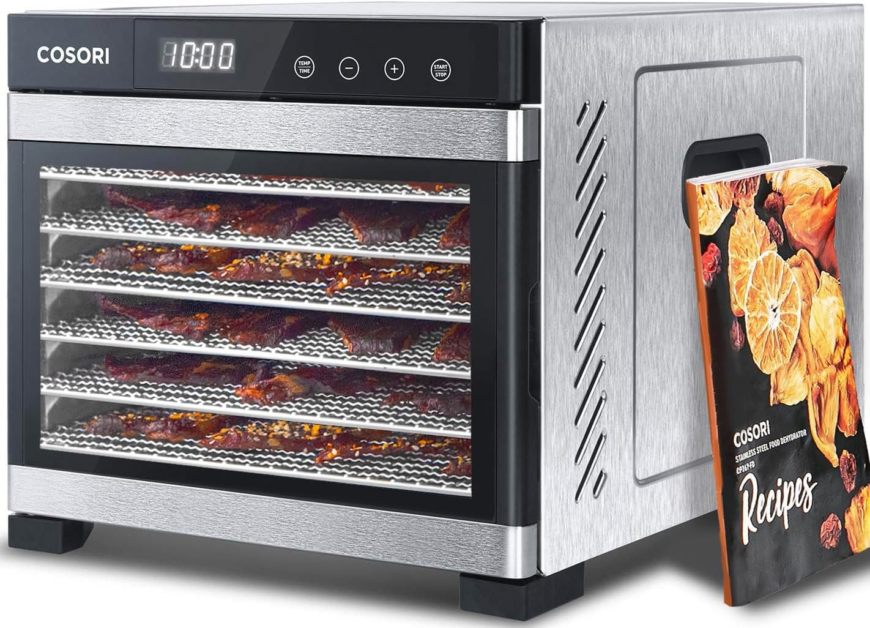
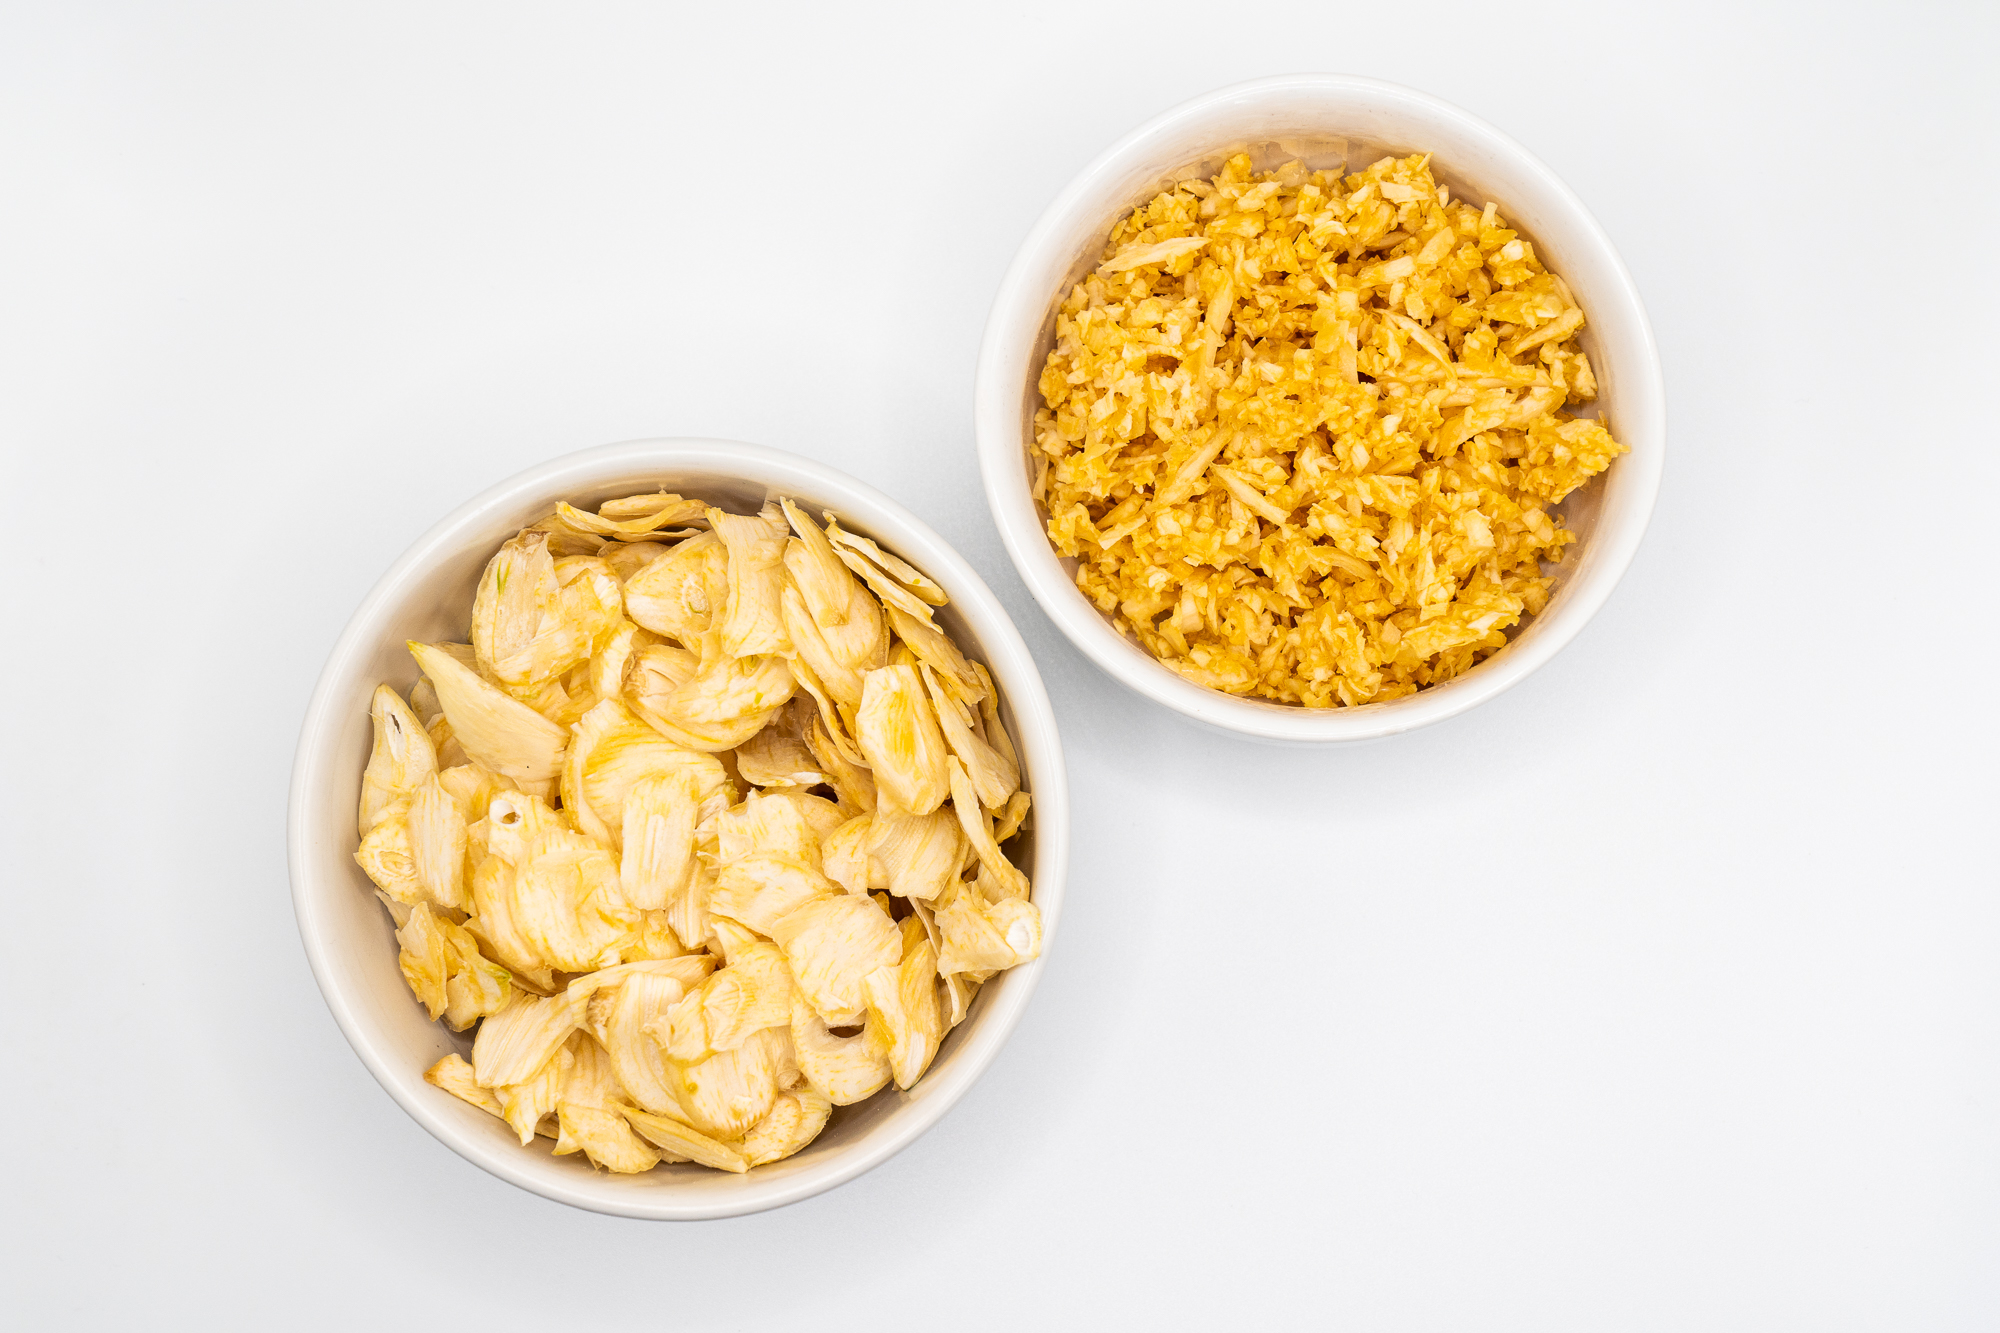
Using a Dehydrator to Cure Garlic
Using a dehydrator is an efficient method for curing garlic, especially for those looking to streamline the process or for individuals lacking ample space for air drying. Dehydrators provide a controlled environment with consistent low heat and good airflow, which is essential for curing garlic effectively.
Here are the steps for air-drying garlic using a dehydrator:

Set your dehydrator to a temperature range between 115°F to 125°F (46°C to 52°C). This ensures that the garlic dries without cooking.
Peel and separate the garlic cloves.
Arrange the cloves on the dehydrator trays in a single layer. Make sure there’s enough space between each clove for proper airflow.
The drying time depends on the dehydrator model and the size of the garlic cloves.
It may take anywhere from 8 to 12 hours for the cloves to dry thoroughly. Keep an eye on them to prevent over-drying.
The garlic is ready when it becomes crispy and dry to the touch.
The cloves should have a papery texture and be easy to break.
Allow the dried garlic to cool completely.
Store the dehydrated garlic in airtight containers in a cool, dark place.
Properly dried garlic can be stored for an extended period.
I recently started using the COSORI Dehydrator for curing garlic and dehydrating other products, and it has been an absolute revelation!The stainless steel design is not only sleek and stylish but also incredibly durable. It’s easy to clean, which is a huge plus when you’re dealing with garlic and other strong-smelling foods.
One of the standout features of this dehydrator is its temperature control. It’s compliant with the US Electrical Standards, which gives me peace of mind. The precise temperature settings allow for perfect curing every time, preserving the flavor and nutritional value of the garlic.The capacity of the COSORI Dehydrator is another major advantage. It comes with multiple trays, providing ample space for curing garlic and dehydrating other products simultaneously. This has significantly increased my productivity and efficiency.
Overall, I am extremely satisfied with the COSORI Dehydrator. It’s a versatile, high-quality appliance that has made the process of curing garlic and dehydrating other products a breeze. I highly recommend it to anyone in need of a reliable and efficient dehydrator! 🌿
- Large Drying Space: With 6.48ft² of space, it accommodates a significant amount of food.
- Powerful Performance: Rated at 600W, it dehydrates food efficiently and quickly.
- Temperature Control: Offers precise temperature control up to 165°F (73°C) for versatile food dehydration.
- Quiet Operation: Operates with noise levels less than 48dB, ensuring minimal disturbance.
- Convenient Features: Includes a 48-hour timer, auto shutoff for safety, and overheat protection.
- Durable Construction: Made with stainless steel trays for long-lasting durability.
- Easy to Clean: Trays are dishwasher safe for convenient cleaning.
- Voltage Limitation: Voltage of 120V applies only to the USA and Canada, requiring an adapter for international use.
- Limited Temperature Range: Maximum temperature of 165°F might be insufficient for certain dehydration needs.
- Size: Large dimensions (17.8″D x 13.5″W x 12.2″H) may require ample storage space.
- Potential Heat Damage: Requires careful placement on heat-resistant surfaces to prevent damage to surrounding areas.
- Limited Warranty Information: Details about the warranty are not readily available, requiring further inquiry.
Storing Cured Garlic Properly
Once your garlic has been properly cured, it is essential to store it correctly to ensure its longevity and quality. One of the best ways to store cured garlic is by keeping it in a cool, dry place with good air circulation. Ideally, garlic should be stored in a well-ventilated area away from direct sunlight.
Another option for storing cured garlic is to hang braided garlic bulbs in a cool, dark location. This method not only provides adequate ventilation but also adds a decorative touch to your storage area. Ensuring that your cured garlic is stored in optimal conditions will help maintain its flavor and quality for an extended period.
Checking for Properly Cured Garlic
Ensuring that garlic is properly cured is crucial for its long-term storage and quality preservation.
- Check outer skin texture: Ensure the outer skin of garlic bulbs is papery and dry, indicating sufficient dehydration during curing.
- Test cloves’ firmness: Gently press cloves to ensure they feel firm and solid, without soft spots or mold development, indicating proper curing.
- Smell for aroma: Properly cured garlic should emit a strong, pungent aroma, signifying retention of essential oils responsible for flavor and health benefits.
- Observe clove color: Look for uniform, light to medium brown coloration of cloves, indicating adequate curing.
- Prevent moisture retention: Any remaining moisture in cured garlic can lead to mold growth or premature sprouting, compromising shelf life.
- Follow correct curing methods: Ensure adherence to appropriate curing techniques and patience in allowing garlic to reach desired texture and aroma.
- Enjoy long-term storage: With proper curing, enjoy a bountiful harvest lasting for months in storage.
Common Mistakes to Avoid When Curing Garlic
One common mistake to avoid when curing garlic is rushing the process. Patience is key when it comes to properly curing garlic for long-term storage. Rushing the curing process can lead to premature spoilage and diminished flavor. Ensure that you give the garlic enough time to dry thoroughly before storing it.
The following table explains common mistakes to avoid when curing garlic:
| Mistake | Treatment | Effect |
|---|---|---|
| 1. Improper Drying Conditions | – Ensure proper ventilation and airflow. | – Prevents mold growth. |
| – Maintain consistent temperature (60-70°F). | – Prevents premature sprouting. | |
| 2. Excessive Moisture | – Avoid exposing garlic to high humidity levels. | – Reduces risk of rotting. |
| – Use a dehumidifier if necessary. | – Prevents mold formation. | |
| 3. Sun Exposure | – Dry garlic in a shaded area or indoors. | – Prevents sunburn and bitterness in cloves. |
| – Use a protective covering if drying outdoors. | – Preserves garlic’s flavor and aroma. | |
| 4. Overcrowding Bulbs | – Ensure proper spacing between garlic bulbs. | – Promotes even airflow and drying. |
| – Avoid stacking or piling garlic during drying. | – Prevents uneven curing and spoilage. | |
| 5. Inadequate Air Circulation | – Use fans or natural breezes to improve airflow. | – Ensures uniform drying of garlic bulbs. |
| – Space garlic bulbs evenly on drying racks. | – Minimizes risk of mold and spoilage. |
How Long Can Cured Garlic Last in Storage
Garlic, when properly cured and stored, can last for an impressive amount of time, making it a valuable addition to your pantry.
Using Cured Garlic in Cooking
Garlic that has been properly cured offers a rich, intense flavor to a myriad of culinary creations.
Here’s a delicious recipe using cured garlic that I personal love. Give it a try!
Roasted Garlic and Herb Butter Shrimp
Ingredients:
- 1 lb large shrimp, peeled and deveined
- 6-8 cloves of cured garlic, minced
- 1/4 cup unsalted butter, melted
- 2 tablespoons fresh parsley, chopped
- 1 tablespoon fresh thyme leaves
- Salt and pepper to taste
- Lemon wedges for serving
Instructions:
- Preheat the oven to 400°F (200°C).
- In a small bowl, combine the minced cured garlic, melted butter, chopped parsley, thyme leaves, salt, and pepper. Mix well to create the herb butter.
- Place the peeled and deveined shrimp in a baking dish in a single layer.
- Pour the herb butter mixture over the shrimp, ensuring they are evenly coated.
- Roast the shrimp in the preheated oven for about 10-12 minutes or until they are pink and cooked through.
- Remove from the oven and serve the roasted garlic and herb butter shrimp hot with lemon wedges on the side.
- Enjoy this flavorful dish as a main course with a side of rice or pasta, or as an appetizer for a special meal.
This recipe showcases the rich flavors of cured garlic combined with aromatic herbs and succulent shrimp for a delightful culinary experience. Bon appétit!
I recently added the Fox Run 3971 Garlic Keeper to my kitchen, and it has been a fantastic addition for storing my cured garlic.The first thing that caught my eye was its elegant design. The white ceramic with the beautifully embossed “Garlic” label adds a touch of class to my kitchen counter.
This garlic keeper is not just about looks; it’s incredibly practical too. It can comfortably store several heads of my cured garlic, keeping them within easy reach when I’m cooking.The keeper’s design helps maintain the freshness of the garlic for a long time. The ventilation holes ensure that the garlic doesn’t get too moist, which can lead to sprouting or mold. Made from ceramic, this garlic keeper is sturdy and durable. I’ve had it for a while now, and it still looks as good as new.
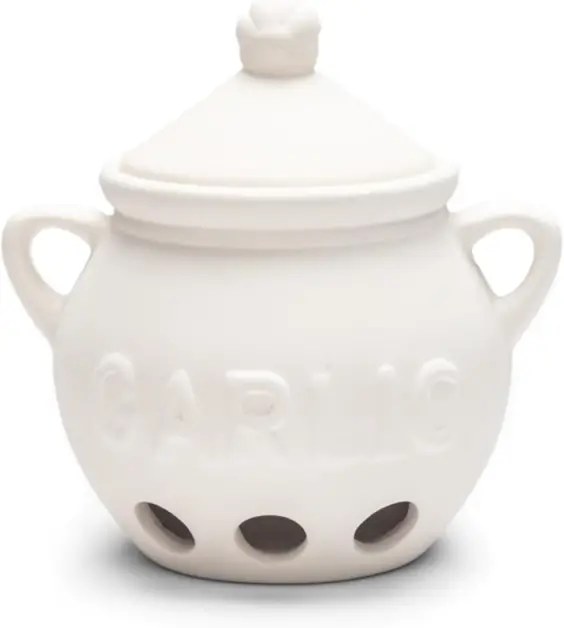
- Stylish Design: The Fox Run Garlic Keeper features a classy white ceramic design with an embossed garlic bulb pot, adding a touch of elegance to any kitchen.
- Effective Odor Elimination: The porous unglazed stoneware and vent holes promote proper airflow, helping to absorb moisture and odors, thereby keeping garlic fresh for longer.
- Convenient Lid: The included lid protects garlic from light exposure, further extending its shelf life.
- Easy to Clean: While some customers have reported issues with staining, the garlic keeper is generally easy to clean, making maintenance hassle-free.
- Spacious Capacity: With dimensions of 5.25 x 4.25 x 5.5 inches and a capacity of 6 pounds, it can accommodate multiple bulbs of garlic, ensuring ample storage space.
- Staining Issues: Some customers have noted that the exterior of the keeper stains easily and is challenging to wash out completely.
- Fragility: A few users have mentioned concerns about the fragility of the ceramic material, advising careful handling to prevent breakage.
- Size Concerns: While the spacious capacity is beneficial for storing multiple bulbs of garlic, it may be larger than expected for some users, potentially taking up more space in the kitchen.
- Unfinished Appearance: A few reviewers have described the ceramic as appearing unfinished or lacking in refinement, detracting from its overall aesthetic appeal.
- Minor Cracks: In rare cases, customers have reported receiving garlic keepers with minor cracks or imperfections, raising durability concerns.
Overall I’m delighted with the Fox Run Garlic Keeper. It’s a perfect blend of style and functionality, making it an essential accessory for any kitchen. I highly recommend it to anyone who uses garlic in their cooking regularly. It’s definitely a keeper!
Additional Tips for Successful Garlic Curing
For successful garlic curing, consider storing your cured bulbs in a well-ventilated area to prevent moisture buildup, which can lead to mold growth. Additionally, removing any excess dirt and roots from the bulbs before curing can help prolong their shelf life. Ensuring that the garlic is fully cured by checking for dry outer skins and firm cloves will also contribute to its long-term storage success.
Here are some additional tips to ensure successful garlic curing:
When hanging or laying out the garlic bulbs, make sure they are not too close to each other. Proper spacing allows for better airflow and prevents mold growth.
During the drying process, inspect the garlic bulbs for any signs of mold. If you notice any, remove the affected bulbs immediately to prevent it from spreading.
While using a dehydrator, stick to the recommended temperature range (115°F to 125°F or 46°C to 52°C). Higher temperatures can cook the garlic instead of drying it.
Once the garlic is fully cured, label the storage containers with the date. This helps you keep track of freshness and ensures you use the oldest garlic first.
If you accidentally over-dry the garlic and it becomes too brittle, you can rehydrate it by soaking the cloves in water for a short time before using them.
Moreover, spacing out the garlic bulbs during the curing process can aid in proper airflow around each bulb, facilitating even drying and reducing the risk of spoilage. Lastly, storing cured garlic in a cool, dark, and dry place, such as a pantry or cellar, will help maintain its flavor and quality over an extended period.Remember, patience and attention to detail are key to successful garlic curing. Enjoy your flavorful homegrown garlic! 🌿🧄
Watch video for more information:
FAQ
Can you store cured garlic in the refrigerator?
It is not recommended to store cured garlic in the refrigerator, as the cold temperatures and moisture can cause the garlic to sprout or become moldy. It is best to store cured garlic in a cool, dry place with good air circulation.
Is it necessary to remove the garlic cloves from the bulb before curing?
No, it is not necessary to remove the garlic cloves from the bulb before curing. Curing the garlic with the cloves still attached to the bulb helps to preserve the garlic and enhance its flavor.
Can I cure garlic outdoors in the sun?
While curing garlic outdoors in the sun may seem like a good idea, it is not recommended as direct sunlight can cause the garlic to become too dry and lose its flavor. It is best to cure garlic in a shady, well-ventilated area.
How do you know if garlic is properly cured?
Properly cured garlic will have dry outer skins, firm bulbs, and a strong garlic smell. You can also check for proper curing by pressing the cloves – they should feel firm and not soft or mushy.
Can I use a microwave to cure garlic?
It is not recommended to use a microwave to cure garlic, as the heat can cause the garlic to cook instead of properly curing it. It is best to use traditional methods such as air drying, braiding, or hanging for garlic curing.

Studied Agricultural Engineering-Plant Protection at University of California, Davis.
Head of Content writing team at Southelmontehydroponics.com