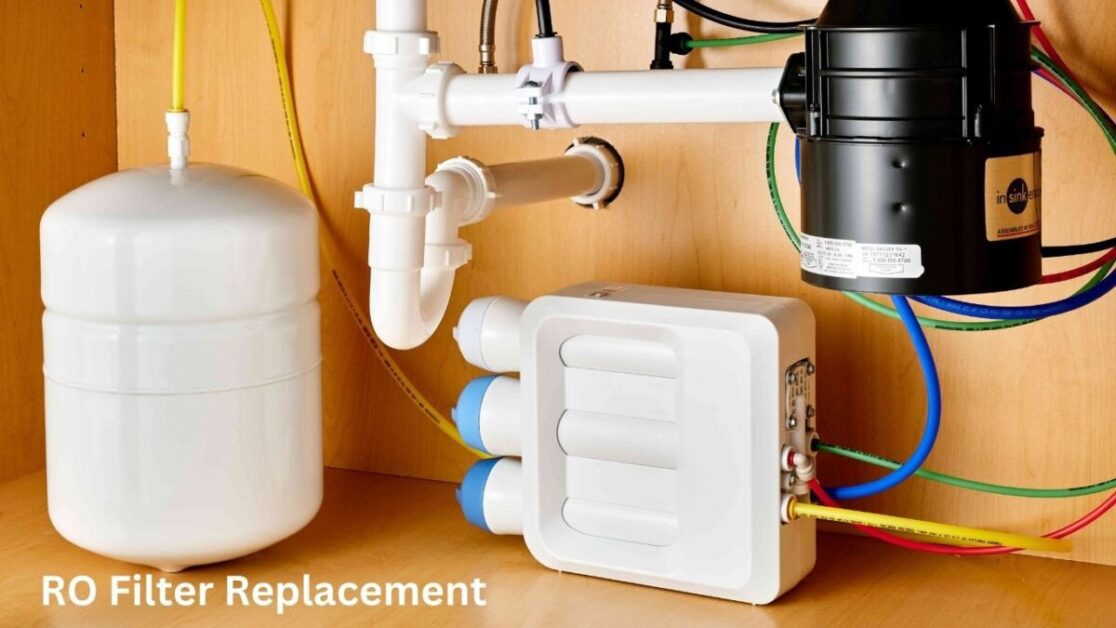
RO Filter Replacement: How to Replace Your Reverse Osmosis Filter and Maintain Your Water Quality
Table of Contents: RO Filter Replacement
RO Filter Replacement- Increased frequency of filter clogs

Filter clogs are a common issue for those utilizing reverse osmosis (RO) systems, and an increased frequency of these clogs can be frustrating and potentially harmful to the system’s efficiency. So what could be causing this rise in filter clogs?
One possible explanation for the increased frequency of filter clogs is the presence of sediment or debris in the water supply. Over time, these particles can accumulate in the RO filters, blocking the flow and reducing their effectiveness. This can lead to a decline in water quality, as well as a decrease in the system’s overall efficiency. To address this issue, it is important to regularly test the water for impurities and identify any potential sources of contamination in order to find an appropriate solution.
RO Filter Replacement- Testing the water for impurities
When it comes to maintaining a healthy and efficient reverse osmosis (RO) system, testing the water for impurities is an essential step. Impurities can not only affect the taste and odor of the water but also compromise its quality and safety for both consumption and use in gardening. By regularly testing the water, you can identify any potential contaminants and take appropriate measures to address them.
There are various methods available for testing water impurities, ranging from simple at-home test kits to more advanced laboratory analysis. At-home test kits often include strips or vials that can test for a range of impurities such as pH levels, chlorine, hardness, and heavy metals. These kits provide a quick and convenient way to get a general idea of the water’s quality. However, for a more comprehensive analysis, it is recommended to send water samples to a certified laboratory. Such laboratories use specialized equipment and techniques to detect a wider range of impurities, including bacteria, viruses, pesticides, and volatile organic compounds.
By regularly testing the water for impurities, you can ensure that your RO system is functioning optimally and producing clean, safe water for your gardening needs. Additionally, this knowledge allows you to take corrective actions, such as adjusting the system settings or replacing filters, to maintain the water quality at an optimal level. Next, let’s delve into the process of gathering the necessary tools and replacement filters for your RO system maintenance.
RO Filter Replacement: Gathering the Necessary Tools and Replacement Filters
To ensure a smooth and successful replacement process for your reverse osmosis (RO) filters, it is essential to gather the necessary tools and replacement filters beforehand. This step will help you avoid any delays or interruptions during the actual replacement.
Start by identifying the specific type of RO filter used in your system. Different RO systems may require different types of filters, so it is crucial to determine the correct ones to avoid any compatibility issues. Research and purchase the appropriate replacement filters based on the specifications of your system. This will ensure that you have the right filters on hand when it’s time for replacement.
Next, gather the essential tools needed for the replacement process. Typical tools you may require include an adjustable wrench, a screwdriver (depending on the type of filter housing), and a towel or cloth for cleaning up any spills or drips. Having these tools readily available will save you time and effort when it comes to removing the old filters and installing the new ones.
By taking the time to gather the necessary tools and replacement filters ahead of time, you will be fully prepared for a smooth and efficient RO filter replacement process. Ensuring you have everything you need will help you avoid any last-minute trips to the store or delays in getting your system back up and running. The next steps in the process will focus on shutting off the water supply and draining the RO system, which are crucial preparatory steps before you proceed with the actual filter replacement.
RO Filter – Identifying the specific type of RO filter used in your system

Identifying the specific type of RO filter used in your system is an essential step in maintaining the efficiency and effectiveness of your water filtration system. There are various types of RO filters available in the market, each designed to target specific impurities or contaminants. By identifying the specific type of filter used in your system, you can ensure that you are using the correct replacement filter to maintain optimum water quality.
To identify the filter type, start by referring to the user manual or documentation provided by the manufacturer. This will typically include detailed information about the specific filters used in your system. Additionally, you can visually inspect the existing filter and check for any labeling or markings that indicate the filter type or model number. Some filters may have specific colors or codes that can help in identifying them. If you are still unsure, you can contact the manufacturer or consult a water filtration expert who can guide you in identifying the correct filter.
Remember, using the wrong type of replacement filter can lead to reduced filtration efficiency, inadequate removal of impurities, and potential damage to your RO system. Taking the time to properly identify the filter type will ensure that you select the most suitable replacement filter for your specific needs, allowing you to maintain clean and safe water for your gardening endeavors.
– Researching and purchasing the appropriate replacement filters
When it comes to researching and purchasing the appropriate replacement filters for your reverse osmosis (RO) system, there are a few key factors to consider. Firstly, you need to identify the specific type of RO filter used in your system. Different systems may require different types of filters, so it’s important to know the exact specifications before making a purchase.
To ensure you are getting the right replacement filters, it is recommended to refer to the manufacturer’s instructions or reach out to their customer support for guidance. They will be able to provide you with the necessary information and recommend the most suitable replacement filters for your specific RO system. When researching different brands and options, it’s important to prioritize quality and reliability. Look for reputable suppliers and read customer reviews to gauge the performance and durability of the filters. Additionally, consider factors such as the lifespan of the filters and the cost of replacement cartridges to make an informed decision.
– Gathering the essential tools needed for the replacement process
To ensure a smooth replacement process for your RO filters, it is essential to gather the necessary tools. Having these tools ready will allow you to complete the task efficiently and without any delays. Here are the essential tools you’ll need:
1. Adjustable wrench: This versatile tool will help you loosen and tighten fittings during the replacement process. Make sure to choose an adjustable wrench that fits securely on the fittings to avoid any damage.
2. Screwdriver: A Phillips or flathead screwdriver may be required to remove any screws or fasteners holding the filter housing in place. Choose the appropriate type and size based on the equipment you have.
3. Bucket or container: It is always a good idea to have a bucket or container nearby to catch any water that may spill during the filter replacement. This will help keep your work area clean and prevent any water damage.
4. Towel or rag: Keep a towel or rag handy to wipe up any spills and to dry off your hands and tools as needed. This will help maintain a safe and clean work environment.
By having these tools readily available, you’ll be well-prepared to tackle the replacement process with confidence and ease. Remember, safety is paramount, so always ensure the power is turned off and follow any manufacturer guidelines specific to your system.
Heading 4: Shutting Off the Water Supply and Draining the RO System
To ensure a smooth and safe replacement process, it is crucial to start by shutting off the water supply to your reverse osmosis (RO) system. Locate the main water shut-off valve, which is typically found near the water source. Carefully turn the valve clockwise until it is tightly closed, effectively stopping the flow of water into the system.
Next, open a faucet connected to the RO system to relieve pressure and drain the system. This step is essential to prevent water from gushing out when you remove the old filters. Allow the water to run for a few minutes until it slows to a trickle. This indicates that the system has been drained, minimizing the risk of water spillage during the filter replacement process.
By following these steps, you can ensure a controlled and efficient shutdown of the water supply to your RO system. This will provide a safe and convenient environment for the next stage of replacing the old filters with new ones.
– Locating the main water shut-off valve
To locate the main water shut-off valve, you will need to familiarize yourself with the layout of your home’s plumbing system. In most cases, the shut-off valve can be found near the water meter or where the main water supply enters your property. It is typically located in the basement, utility room, or near the water heater. Look for a valve that connects the main water line to the rest of your plumbing system.
If you are unable to locate the shut-off valve inside your home, you may need to check outside. The valve is often located near the ground, either in a meter box or underground vault. In colder climates where freezing is a concern, the shut-off valve may be located in a heated utility room or insulated box to prevent it from freezing.
It is crucial to locate the main water shut-off valve beforehand, so you are prepared for any emergency or maintenance work that requires the water supply to be shut off. By knowing its exact location, you can quickly and efficiently stop the flow of water in case of a leak or other plumbing issues.
– Opening a faucet to relieve pressure and drain the system
To ensure a smooth and safe replacement process for your RO system filters, it is essential to first relieve the pressure and drain the system. This step is crucial as it prevents any potential damage or leakage during the replacement process. To do this, you can simply open a faucet connected to the RO system.
By opening the faucet, you allow the release of built-up pressure in the system. This pressure can result from the water supply continuously feeding into the RO unit. It is important to ensure that the faucet you open is directly connected to the RO system, as this will enable the water to flow out of the system and relieve the pressure effectively. Additionally, draining the system through the faucet helps remove any accumulated impurities or debris, contributing to a cleaner and more efficient replacement process.
• Opening a faucet connected to the RO system is crucial for relieving pressure and draining the system before replacing filters.
• This step prevents potential damage or leakage during the replacement process.
• The faucet should be directly connected to the RO system to allow water to flow out and relieve pressure effectively.
• Draining the system through the faucet helps remove impurities and debris, ensuring a cleaner and more efficient replacement process.
– Ensuring a smooth and safe replacement process by turning off the water supply

To ensure a smooth and safe replacement process when replacing the filters in your RO system, it is essential to turn off the water supply. This step is crucial to avoid any potential accidents or damage during the filter replacement. By shutting off the water supply, you prevent water flow and pressure, allowing for a controlled and hassle-free replacement process.
Turning off the water supply is relatively simple, but it may vary depending on the specific plumbing setup in your home. Generally, you can locate the main water shut-off valve in the basement or utility room. It is usually a lever or a wheel-like valve that can be turned clockwise to shut off the water flow. Once you have identified the shut-off valve, proceed to turn it off to stop the water flow to your RO system.
Remember, safety should always come first when performing any maintenance tasks. Take the necessary precautions to ensure that the water supply is completely shut off before proceeding with the replacement process. This will help you avoid potential flooding and damage to your system, and allow for a smooth and seamless filter replacement.
Certainly! Here are two tables outlining the steps to replace reverse osmosis (RO) filters and maintain water quality:
Table 1: Steps to Replace Reverse Osmosis Filters
| Step | Description |
|---|---|
| 1. | Turn Off Water Supply: Shut off the water supply to the RO system to prevent water flow during the replacement process. |
| 2. | Release Pressure: Open the RO faucet to release any pressure in the system. |
| 3. | Locate Filter Housing: Identify the filter housing that needs replacement. Common filters include sediment, carbon, and membrane filters. |
| 4. | Remove Old Filter: Unscrew the filter housing and remove the old filter cartridge. Dispose of the used filter properly. |
| 5. | Clean Housing: Wipe the filter housing with a clean, damp cloth to remove any residue or impurities. |
| 6. | Install New Filter: Insert the new filter cartridge into the housing, following the manufacturer’s instructions for proper alignment. |
| 7. | Tighten Housing: Screw the housing back into place securely. Be careful not to overtighten to avoid damage. |
| 8. | Turn On Water Supply: Turn the water supply back on and check for any leaks around the filter housing. |
| 9. | Flush System: Allow the system to run for a few minutes to flush out any air bubbles and ensure the new filter is functioning properly. |
| 10. | Check for Leaks: Inspect the entire RO system for leaks and fix any issues immediately. |
| 11. | Reset Filter Change Indicator: If your RO system has a filter change indicator, reset it according to the manufacturer’s instructions. |
Table 2: Maintaining Water Quality in Your RO System
| Step | Description |
|---|---|
| 1. | Regular Inspections: Periodically inspect the RO system for any signs of leaks, damage, or wear on hoses and connections. |
| 2. | Sanitization: Follow the manufacturer’s guidelines for sanitizing the RO system regularly. This helps prevent bacterial growth and ensures water quality. |
| 3. | Monitor Water Pressure: Keep an eye on the water pressure. Low pressure may indicate a clogged filter or a malfunction that needs attention. |
| 4. | Replace Prefilters: Replace sediment and carbon pre-filters as recommended by the manufacturer to maintain optimal performance. |
| 5. | Check RO Membrane: Monitor the condition of the RO membrane. If TDS (Total Dissolved Solids) levels are rising, it may be time to replace the membrane. |
| 6. | Test Water Quality: Regularly test the water quality from the RO system to ensure it meets desired standards. |
| 7. | Filter Change Schedule: Adhere to the recommended filter change schedule provided by the manufacturer for all components, including sediment, carbon, and membrane filters. |
| 8. | Professional Servicing: Consider professional servicing at least once a year to address any potential issues and ensure the long-term efficiency of the RO system. |
| 9. | Educate Users: Inform users about proper maintenance practices, such as not overusing the system and reporting any unusual changes in water taste or quality. |
These tables provide a comprehensive guide for replacing RO filters and maintaining water quality in a reverse osmosis system. Always refer to the specific manufacturer’s instructions for your RO system for accurate guidance.
Heading 5: Removing the Old RO Filters
When it comes time to replace the old RO filters in your system, it’s important to approach the task with care and precision. Before you begin, make sure you understand the layout of the filter housing and how to access the filters. This will help you work efficiently and avoid any unnecessary damage to the system.
Once you’ve familiarized yourself with the filter housing, it’s time to start removing the old RO filters. Begin by carefully unscrewing the filter housing caps, taking care not to force them or apply excessive pressure. Once the caps are removed, gently slide out the old filters from their respective housings. Be cautious when handling the filters, as they may still contain trapped water or debris.
Remember, the filters play a crucial role in purifying the water and ensuring the effectiveness of your RO system. By removing the old filters properly and with caution, you can ensure a smooth and successful replacement process.
– Understanding the filter housing and how to access the filters
To properly maintain and replace the filters in your reverse osmosis (RO) system, it is essential to have a thorough understanding of the filter housing and how to access the filters. The filter housing is the container that holds the filters and is typically located under the sink or in the basement where the RO system is installed.
To access the filters, you will need to first locate the filter housing. This can usually be done by following the RO system’s water lines from the faucet to the housing. Once you have found the housing, you may need to remove any protective covers or panels to gain access to the filters.
The filter housing is designed to be user-friendly, with easy access to the filters. Depending on the model of your RO system, the housing may have a twist-off or a push-in mechanism to remove the filters. Refer to the manufacturer’s instructions or user manual to determine the specific method required for your system. It is important to follow these instructions carefully to avoid damaging the housing or the filters during the removal process.
By familiarizing yourself with the filter housing and understanding how to access the filters, you will be better equipped to perform regular maintenance on your RO system. This knowledge will also ensure a smooth and efficient replacement process when the time comes to change the filters.
– Carefully
Removing the old reverse osmosis (RO) filters requires a delicate touch to ensure a smooth and safe replacement process. Start by understanding the filter housing and how to access the filters. Most RO systems have a housing that can be unscrewed or unlatched to expose the filters inside. Take extra care when handling the filters, as they are delicate and can easily break if mishandled. Slowly and gently remove the old filters from their housing, being mindful of any loose or protruding parts. Dispose of the old filters properly, following local regulations for the disposal of water treatment equipment.
Once the old filters have been removed, take a moment to assess the condition of the housing and surrounding areas. Look for any signs of damage or wear that may require immediate attention or replacement. Inspect the O-rings or gaskets that seal the housing to ensure they are intact and in good condition. If any damage or wear is observed, it is recommended to replace these components before proceeding with the installation of the new filters. Remember, a careful and thorough inspection at this stage can prevent potential leaks or damage to the system later on.
How often should I expect my RO filter to clog?
The frequency of filter clogs can vary depending on factors such as water quality and usage. It is recommended to monitor your filter regularly and clean or replace it when necessary.
What impurities should I test my water for?
It is important to test your water for various impurities such as bacteria, viruses, heavy metals, chemicals, and other contaminants. This will help determine the effectiveness of your RO system and identify any potential health risks.
What tools do I need to gather for replacing the RO filters?
The necessary tools for the replacement process may include a wrench, screwdriver, or other tools specific to your RO system. It is advisable to consult your system’s manual or manufacturer for a comprehensive list of tools required.
How do I identify the specific type of RO filter used in my system?
To identify the specific type of RO filter used in your system, you can refer to the manual or documentation provided by the manufacturer. Additionally, you can contact the manufacturer directly for assistance or consult a professional in water filtration.
Where can I purchase the appropriate replacement filters for my RO system?
Replacement filters for RO systems can be purchased from various sources, including online retailers, specialty water filtration stores, or directly from the manufacturer. It is recommended to ensure the filters are compatible with your specific system model.
How do I locate the main water shut-off valve for the RO system?
The main water shut-off valve for your RO system is typically located near the water source or the entry point of the water supply. It is advisable to check the plumbing layout of your property or consult a professional plumber if you are unsure.
How can I relieve pressure and drain the RO system before replacing the filters?
To relieve pressure and drain the RO system, you can open a faucet connected to the system. This will allow water to flow out and reduce the pressure inside the system, ensuring a safer replacement process.
What precautions should I take while removing the old RO filters?
When removing the old RO filters, it is important to handle them with care to avoid any damage or contamination. Follow the instructions provided by the manufacturer and take necessary precautions to ensure a clean and safe replacement process.