Harvesting Sweet Potatoes: How To Dig And Store Them
Hey there, sweet potato enthusiasts! Did you know that sweet potatoes are not only delicious but also packed with nutrients like Vitamin A and fiber? If you’re ready to dive into the world of harvesting these tasty tubers, you’ve come to the right place. In this blog, we’ll walk you through the art of digging up sweet potatoes and storing them properly for long-lasting freshness. From the best tools to use to the ideal storage conditions, we’ve got you covered. Get ready to elevate your sweet potato game and enjoy a bountiful harvest all year round. Let’s dig in and store those sweet spuds like a pro!
Table of Contents
Preparing for Harvest
Preparing for harvest is a crucial step in ensuring a successful yield of sweet potatoes. As a gardener, it is important to be well-prepared and equipped with the necessary tools and knowledge to reap the fruits of your labor. While the process may vary depending on factors such as soil conditions and climate, there are some general guidelines that can help you achieve optimum results.

- Monitor signs of maturity in sweet potato plants closely, including:
- Observing the color and size of the leaves.
- Assessing the condition of the vines.
- Look for vibrant green leaves and sturdy, healthy vines in a well-matured plant.
- Timing of harvest may vary based on personal preferences for sweet potato size.
- Keep a watchful eye on these indicators to determine the ideal harvest time.
- Prepare the soil properly before harvesting sweet potatoes:
- Ensure the soil is loose and well-drained to facilitate easy harvesting.
- Gently loosen the soil around the sweet potato bed using a garden fork or cultivating tool.
- Exercise caution to avoid damaging the tubers during soil preparation.
- Adequately preparing the soil will make the harvesting process smoother and more efficient.
Stay tuned for more expert tips on the next parts of this series, where we will guide you on selecting the right tools, identifying signs of maturity, and the process of gently lifting the vines. Happy harvesting!
“The Complete Guide to Growing and Harvesting SWEET Potatoes” has been an invaluable resource in my journey to cultivate potatoes in my garden. Its comprehensive approach and step-by-step guidance have empowered me with the knowledge and confidence needed to successfully grow and harvest potatoes. From selecting the right varieties to troubleshooting common issues, this book covers every aspect of potato cultivation with clarity and detail.
I particularly appreciated the troubleshooting tips and advice on harvesting and storage, which have helped me overcome challenges and maximize my harvest. While it may lack digital resources and region-specific information, its thorough coverage and practical insights make it an essential companion for anyone venturing into potato gardening. Overall, I highly recommend this book to both novice and experienced growers alike.

- Comprehensive Information: “The Complete Guide to Growing and Harvesting Potatoes” offers a wealth of information on every aspect of potato cultivation, from planting to harvesting, making it suitable for both beginners and experienced growers.
- Step-by-Step Guidance: The book provides clear and detailed instructions, accompanied by illustrations or photographs, to guide readers through each stage of potato growing, ensuring success even for novices.
- Potato Varieties: Readers appreciate the coverage of various potato varieties, including popular ones and lesser-known types, allowing them to choose the best options for their climate, soil, and culinary preferences.
- Troubleshooting Tips: The book includes troubleshooting sections that address common problems and challenges faced by potato growers, offering practical solutions to overcome issues such as pests, diseases, and environmental factors.
- Harvesting and Storage Advice: With detailed guidance on when and how to harvest potatoes, as well as tips for proper storage to prolong freshness, the book helps ensure a bountiful harvest and minimal waste.
- Suitable for Different Environments: Whether you’re growing potatoes in a backyard garden, allotment, or container, the book provides adaptable strategies and techniques to suit various growing environments.
- Lack of Digital Resources: Some readers may prefer access to digital resources such as online videos or interactive tools to complement the information provided in the book, which is solely in print format.
- Regional Specificity: While the book offers general advice applicable to many regions, it may lack specific information tailored to certain climates, soils, or potato varieties found in particular geographic areas.
- Limited Visuals: Although the book may include illustrations or photographs, some readers may find them insufficient or wish for more visuals to aid in understanding specific concepts or techniques.
- Price: The cost of “The Complete Guide to Growing and Harvesting Potatoes” may vary, and some readers may find it relatively expensive compared to other potato gardening resources available.
Selecting the Right Time
:strip_icc()/101127000-5793f0d3cbb640c793523a7382c6c3c2.jpg)
- As a gardening enthusiast, one of the most critical factors in ensuring a successful harvest is selecting the right time to gather your crops.
- Timing is everything when it comes to reaping the rewards of your hard work in the garden. So how do you determine when the perfect moment has arrived?
- The key to selecting the right time lies in observing the crop’s peak maturity.
- Different crops have different indicators that can help guide you in this process.
- For example, when it comes to harvesting tomatoes, you can look for a change in color from green to red or orange, a slight softening of the fruit, and a sweet aroma.
- On the other hand, for root vegetables like carrots, you can gently pull them out of the ground and examine their size and firmness.
- These signs of maturity can be invaluable in ensuring that you harvest your crops at their peak flavor and nutritional content.
Choosing the Ideal Tools
Choosing the ideal tools for harvesting sweet potatoes is crucial to ensure a smooth and efficient process. The right tools not only make the task easier but also help preserve the quality of the potatoes.
garden fork
:max_bytes(150000):strip_icc()/how-to-grow-sweet-potatoes-5116109-03-7aa872eb7b8e40739a806b8895e5081c.jpg)
One essential tool for harvesting sweet potatoes is a garden fork with sturdy tines. This tool allows you to gently lift the vines and loosen the soil without damaging the tubers. A garden fork with a long handle provides better leverage, reducing strain on your back and arms as you dig.
pruning shears or sharp garden
Another useful tool for harvesting sweet potatoes is a pair of pruning shears or sharp garden scissors. These are handy for cutting away any excess foliage or vines that may hinder your access to the potatoes. Additionally, they can help you carefully remove any unwanted or damaged roots, allowing you to focus on the most vigorous and healthy plants.
When selecting tools for harvesting sweet potatoes, it is essential to prioritize quality and durability. Invest in tools made from high-quality materials that can withstand the rigors of digging and cutting through tough soil and foliage. Taking the time to choose the right tools will not only make the harvesting process more enjoyable but also ensure that you can harvest your sweet potatoes with ease while maintaining their integrity.
The following table explain about the different tools:
| Tool | Function | Quantitative Value |
|---|---|---|
| 1. Garden Fork | – Loosens soil and lifts sweet potatoes. | – Tine length: 8-10 inches. |
| 2. Hand Trowel | – Excavates soil around delicate tubers. | – Blade width: 2-3 inches. |
| 3. Garden Shovel | – Digs deeper for large or deep-set potatoes. | – Blade length: 8-12 inches. |
| 4. Harvesting Knife | – Cuts stems and vines for easy access. | – Blade length: 5-7 inches. |
| 5. Harvesting Gloves | – Protects hands from cuts and abrasions. | – Material: Durable, flexible. |
Review for the Felco F-2 Classic Manual Pruner:
“The Felco F-2 Classic Manual Pruner is a game-changer in the world of gardening tools. Its sturdy construction and precise cutting make pruning a breeze. I’ve used it to trim branches, deadhead flowers, and even harvest fruits, and it hasn’t disappointed. The ergonomic design ensures that I can work for hours without feeling any discomfort. While it may come with a slightly higher price tag, the quality and durability of this pruner make it well worth the investment. Overall, I highly recommend the Felco F-2 to any serious gardener looking for a reliable and efficient pruning tool.”
Review for the Spear & Jackson Traditional Stainless Steel Garden Fork:
“The Spear & Jackson Traditional Stainless Steel Garden Fork is a solid addition to my gardening arsenal. Its classic design and stainless steel construction give it a timeless appeal while ensuring durability and resistance to rust. I’ve used it for turning soil, lifting plants, and even spreading compost, and it has performed admirably. While it may be a bit heavier than other forks I’ve used, the ergonomic handle makes it comfortable to hold and maneuver. Overall, I’m pleased with the quality and performance of this garden fork and would recommend it to fellow gardeners looking for a reliable tool.”

✅ Durable Construction: Made from high-quality stainless steel, this garden fork offers durability and resistance to rust, ensuring long-term performance in various weather conditions.
✅ Comfortable Handle: The ergonomic handle is designed for comfortable grip and reduced hand fatigue during extended use, enhancing user comfort and control.
✅ Multi-Purpose: Suitable for a variety of gardening tasks, including turning soil, lifting and aerating, this garden fork is a versatile tool for both amateur and professional gardeners.
✅ Easy Maintenance: Stainless steel construction makes the fork easy to clean and maintain, requiring minimal effort to keep it in optimal condition for years of use.
✅ Trusted Brand: Spear & Jackson is a reputable brand known for producing high-quality garden tools, providing reassurance of reliability and performance.
❌ Weight: While stainless steel construction adds durability, it may also result in a heavier overall weight compared to forks made from lighter materials, potentially causing fatigue during prolonged use.
❌ Handle Material: While the handle is comfortable to grip, it is made from plastic, which may not offer the same level of durability and longevity as wooden handles.
❌ Lack of Additional Features: This garden fork may lack additional features or innovations found in more modern designs, limiting its appeal for those seeking advanced functionality or specialized features.
❌ Limited Availability: Depending on location, availability of the Spear & Jackson Traditional Stainless Steel Garden Fork may be limited, requiring purchase from specific retailers or online sources.
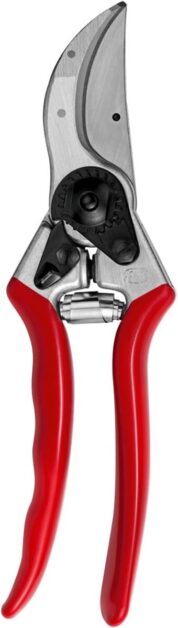
✅ Ergonomic Design: Designed for comfort and ease of use, this pruner features ergonomically shaped handles that reduce hand fatigue during prolonged use.
✅ Precision Cutting: Equipped with a hardened steel blade and anvil blade, this pruner delivers precise and clean cuts, promoting healthy plant growth and minimizing damage.
✅ Versatile: Suitable for a wide range of pruning tasks, from trimming branches to cutting flowers and harvesting fruits, making it a versatile tool for gardeners.
✅ Replaceable Parts: Felco pruners are designed with replaceable parts, allowing for easy maintenance and extending the lifespan of the tool.
✅ Trusted Brand: Felco is a well-known and respected brand among gardeners, renowned for producing high-quality pruning tools that deliver reliable performance.
❌ Requires Maintenance: While the pruner is durable, it requires regular cleaning, lubrication, and sharpening to maintain optimal performance, which may require additional time and effort.
❌ Size and Weight: Some users may find the pruner to be larger and heavier than other models, which could affect comfort and maneuverability, especially for individuals with smaller hands.
❌ Limited Reach: The pruner’s cutting capacity may be limited for thicker branches, requiring users to use a different tool for larger pruning tasks.
❌ Not Suitable for Left-Handed Users: The design of the Felco F-2 Classic Manual Pruner is optimized for right-handed use, which may not be ideal for left-handed gardeners.
❌ Potential for Hand Fatigue: Despite its ergonomic design, prolonged use of the pruner may still lead to hand fatigue, particularly during intensive pruning sessions.
Identifying Signs of Maturity
Identifying Signs of Maturity in your sweet potatoes is crucial for ensuring a successful harvest. As a gardener, it is essential to know when your potatoes have reached their peak ripeness, as this will determine their flavor, texture, and overall quality.

Size and shape are also indicative of maturity, with fully mature potatoes typically measuring 2-3 inches in diameter and having a consistent shape.
The following table explains about the signs of maturity of sweet potatoes:
| Signs of Maturity | Description | Quantitative Value |
|---|---|---|
| 1. Vine Browning | – Vine foliage turns yellow and begins to wither. | Typically occurs after 110-140 days of planting. |
| 2. Tuber Size | – Tubers reach a desirable size for harvesting. | Optimal tuber size: 2-3 inches in diameter. |
| 3. Skin Color | – Sweet potato skin develops a rich, deep color. | Skin turns reddish-orange or coppery-brown. |
| 4. Firmness | – Tubers feel firm and well-formed when gently squeezed. | Firmness indicates mature tubers ready for harvest. |
| 5. Leaf Yellowing | – Leaves above ground begin to yellow and die back. | Typically observed 2-3 weeks before harvest. |
Loosening the Soil
To ensure a successful harvest, it is crucial to loosen the soil around your sweet potato plants. This process helps promote healthy root growth and makes it easier to extract the tubers without damaging them. Loosening the soil also improves the plant’s access to nutrients and water, which leads to better overall yields.
Timing for loosening soil:
- Best to loosen soil a few weeks before harvesting when sweet potatoes have reached peak size but are still attached to the vine.
- Allows plants to continue receiving nutrients while preparing soil for harvest.
- Check for signs of maturity like yellowing leaves and declining vine vigor before loosening soil.
Gardening tools for soil loosening:
- Use a garden fork or a potato hook for effective soil loosening.
- Insert the tool about one foot away from the plant’s center, gently push it into the ground, and lift the soil upwards.
- Repeat the process around the plant’s circumference, avoiding damage to roots or vines.
- Loosening soil creates space for sweet potatoes to loosen their hold, facilitating easier extraction during harvest.
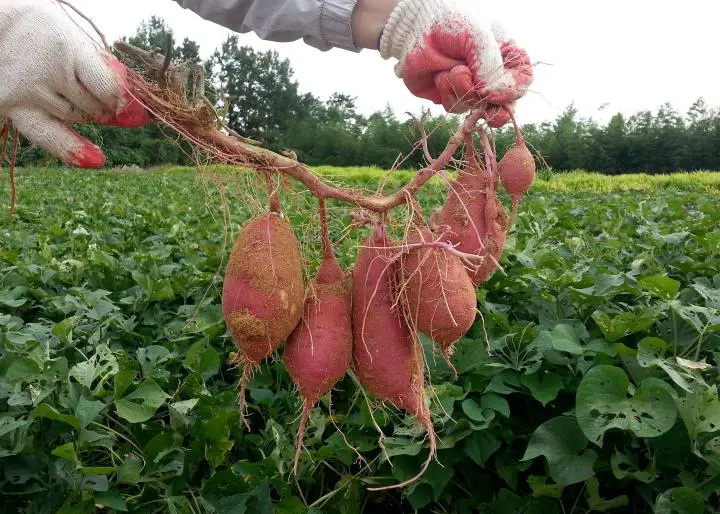
Gently Lifting the Vines
After months of careful nurturing and tending to your sweet potato plants, the time has finally come to harvest the precious tubers. Gently lifting the vines is a crucial step in this process, as it ensures minimal damage to both the vines and the potatoes themselves. So, how do you go about this task with finesse and precision?

- Ensure the soil around the sweet potato plants is moist but not overly wet to facilitate easier lifting of vines.
- Position a garden fork or digging fork a few inches away from the plant base.
- Gently push the fork into the ground and use a slight rocking motion to lift the vines alongside it.
- Avoid exerting too much force to prevent damage to potatoes.
- Gradually release the vines while lifting, allowing soil to crumble away from the roots.
- This method preserves crop integrity and provides a clear view of the harvest, aiding in identifying ready-to-pick potatoes.
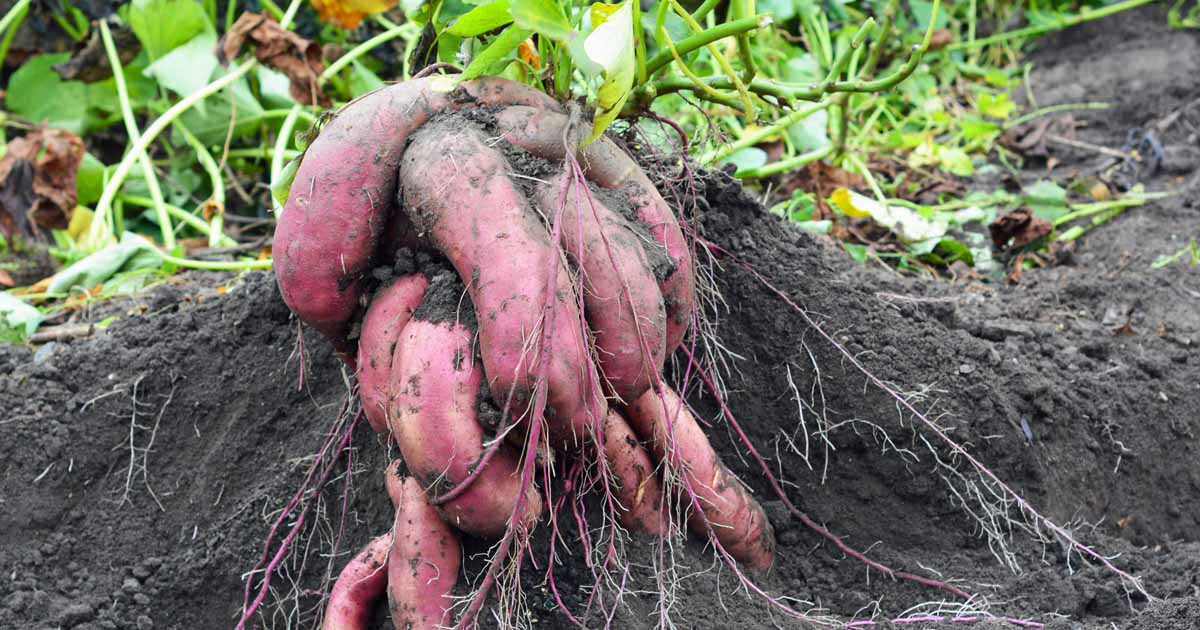
Digging up the Potatoes
Digging up the potatoes is an essential step in the harvesting process, as it allows us to reap the rewards of our hard work and enjoy the delicious bounty of fresh, homegrown potatoes. When it comes to this task, a gentle touch and careful technique are crucial to ensure minimal damage to the tubers.

Loosening soil around potato plants:
- Use a garden fork or shovel, careful not to pierce or cut into tubers.
- Work tool into soil a few inches away from the base of the plant and gently lever upwards to loosen the earth.
- Repeat process in a circle around the plant, gradually widening the area to create a loose pocket around the roots.
Delicately lifting the vines:
- Use hands or a gardening fork to gently lift the foliage of the plant.
- Take care not to break or damage stems or tubers.
- Expose potatoes without causing unnecessary harm to the delicate plants.
Digging up the potatoes:
- Use hands or a small garden fork to carefully dig around the base of the plant.
- Avoid sudden or forceful movements that could bruise or break the potatoes.
- Gently remove excess soil clinging to the tubers, taking care not to scrub or rub them too vigorously.
By following these steps, you can unearth your potatoes with care and precision, ensuring a bountiful harvest without compromising the quality of your tubers. The next important step is to proceed with cleaning off excess soil and curing the sweet potatoes, both of which are essential for optimal storage and long-lasting freshness.
Cleaning Off Excess Soil
Cleaning off excess soil is an important step in the harvesting process that ensures the sweet potatoes are properly prepared for storage.
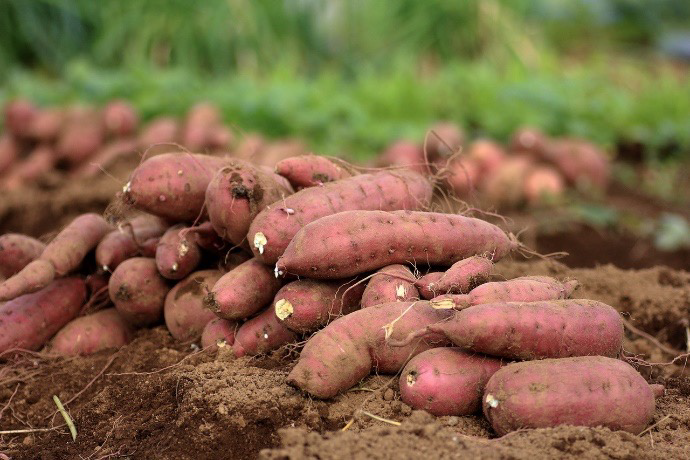
Cleaning sweet potatoes after harvesting:
- Remove excess soil clinging to the skin to prevent pests, diseases, or contaminants.
- Gently brush the potatoes with a soft brush or cloth.
- Start by removing larger clumps of soil by hand.
- Use the brush or cloth to gently wipe away remaining dirt.
- Avoid rubbing too vigorously to prevent skin damage like scratching or bruising.
Importance of cleaning:
- Thoroughly cleaning off excess soil ensures the quality and shelf life of sweet potatoes.
- Improves the appearance of potatoes, making them more visually appealing.
- Clean, blemish-free potatoes are more enticing to potential buyers or recipients.
Taking the time to properly clean your sweet potatoes will contribute to their overall quality and enhance your harvest experience.
Curing the Sweet Potatoes
After the sweet potatoes have been dug up and cleaned, it is important to proceed with the curing process. Curing plays a vital role in enhancing the flavor and texture of sweet potatoes, as well as extending their shelf life. During curing, the sweet potatoes undergo a process of healing and toughening the skin, allowing them to store well over an extended period.

- Initiate the curing process by placing sweet potatoes in a warm and humid environment for 10 to 14 days.
- Maintain a temperature of 80-85 degrees Fahrenheit (27-29 degrees Celsius) and humidity levels between 85-95%.
- Achieve this environment using a curing room, humidity-controlled cabinet, or a large plastic storage bin with a lid.
- Ensure good air circulation to prevent mold growth and facilitate the healing process.
- During curing:
- Chemical reactions convert starches into sugars, enhancing sweetness.
- The healing process occurs, sealing any small injuries or cuts on the sweet potatoes’ skin to prevent decay.
With proper curing, sweet potatoes can develop a well-rounded flavor profile, making them a delectable addition to your culinary creations.
Proper Storage Techniques
Proper storage techniques play a crucial role in maintaining the quality and longevity of harvested sweet potatoes. After the curing process, it is essential to store the potatoes in appropriate conditions to prevent spoilage and preserve their flavor and nutritional value.

Keep in a cool, dry, and well-ventilated area.
Ideal temperature: 55 to 60 degrees Fahrenheit (12 to 15 degrees Celsius).
Maintain relative humidity around 85%.
These conditions slow down sprouting and prevent rotting.
Sunlight or artificial light can cause greening and the accumulation of undesirable compounds.
Light exposure affects taste and quality of sweet potatoes.
Store sweet potatoes away from other fruits and vegetables.
Other produce releases ethylene gas, which accelerates spoilage.
Use breathable containers like baskets or crates for storage.
Avoid plastic bags as they hinder air circulation and increase the risk of decay.
To ensure that the stored sweet potatoes are in good condition, it is recommended to check them periodically for any signs of decay or sprouting. Remove any spoiled or rotten tubers promptly to prevent the spread of decay. With the right storage techniques, your sweet potatoes can remain fresh and delicious for several months, providing you with a healthy and flavorful addition to your meals.
Watch video for more information:
fAQ
How long can sweet potatoes be stored?
Sweet potatoes can be stored for several months if the proper storage techniques are followed.
What is the ideal temperature for storing sweet potatoes?
Sweet potatoes should be stored at a temperature between 55-60°F (13-15°C).
Can sweet potatoes be stored in the refrigerator?
No, sweet potatoes should not be stored in the refrigerator as the cold temperature can alter their taste and texture.
How do I know if a sweet potato is mature enough to harvest?
Look for signs such as the leaves starting to turn yellow, vines beginning to die back, and the skin of the sweet potatoes thickening.
What tools are recommended for harvesting sweet potatoes?
It is recommended to use a garden fork or a spading fork to gently lift the vines and dig up the sweet potatoes.
Do I need to cure sweet potatoes before storage?
Yes, curing sweet potatoes is essential for proper storage. It involves keeping the harvested sweet potatoes in a warm and humid environment for about 10-14 days.
How can I clean excess soil off the sweet potatoes?
Use a soft brush or a cloth to gently brush off excess soil from the sweet potatoes. Avoid using water as it can introduce moisture, leading to spoilage.
Can I store sweet potatoes together with other fruits and vegetables?
It is best to store sweet potatoes separately from other fruits and vegetables, as the ethylene gas they produce can promote sprouting and spoilage.
Are there any signs I should look for to identify spoiled sweet potatoes?
Yes, look for signs of mold, shriveling, soft spots, or an unpleasant odor. Discard any sweet potatoes showing these signs to prevent the spread of spoilage.
Can I freeze sweet potatoes for long-term storage?
Yes, sweet potatoes can be frozen for long-term storage, but they should be cooked and mashed or pureed before freezing.

Studied Agricultural Engineering-Plant Protection at University of California, Davis.
Head of Content writing team at Southelmontehydroponics.com